AURORA – Archive Upload Research Objects for Retrieval and Alteration is a system for facilitating transport of science data generated in laboratories to a storage system and allowing sharing and moving of data to other locations for processing or further storing. It offers a rich and flexible way of attaching metadata to the stored datasets, including templating.
The system can be logged into from here:
https://www.aurora.it.ntnu.no
Everyone having lab computers can start to use the archive system provided they meet the necessary criteria (network access, support for a needed transport protocol etc.). Both internal NTNU users and external users are allowed.
Here are guides on how to get to use the AURORA-system both for users and computers/laboratories.
For NTNU-users the ability to login and start using the system can be achieved by the user himself. This is done by going to the archive systems web address:
https://www.aurora.it.ntnu.no
and selecting “FEIDE login”. Log on with your username and password at NTNU. The AURORA-system will then create a user account automatically based on the credentials from FEIDE.
For users external to NTNU or who do not have access to a NTNU-account, they need to have either the IT-service or a someone with permissions to create users for the department in question. For the IT-services to add external users, please send an email to orakel@ntnu.no and include their first name, last name and email address and state that it concerns adding a user to the AURORA-system.
There are also some laboratories that have such a restricted network access that they cannot even reach the NTNU internet resources (except for the AURORA-system). These computers are not able to login using the FEIDE-authentication. Then the user needs to use his email-address in the AURORA-system and its password. The password for the AURORA-system itself can differ from the FEIDE/NTNU-password.
The password for a user can be changed inside the web-interface for the AURORA-system. Be aware that this will only change the password for the AURORA-system itself, not the FEIDE-account.
When an account is generated by the IT-services or someone with the permissions a password will be automatically generated and sent to the user. The user can then change this password him- or herself.
Furthermore, the user needs to have permission to create datasets on a socalled research group (or research area group, all dependant upon how it is organized). This permission can be arranged by the administrators of the various labs. To view datasets that others have created on a research group, the user will need separate rights for this. This can also be arranged by the administrators of the labs.
In order for a computer in a laboratory to be able to start using the AURORA-system and store its data there, it has to be registered by the IT-services. In addition we would need some information:
Collect this information and send a request to the IT-services in order for us to add the lab computer to the AURORA-system.
In many places of the AURORA web-client it is possible to both select values from a dropdown and type part of words of what you are searching for and have the dropdown come with the closest match. This makes it much easier to find what you are looking for if the dropdown has a lot of possible selections. You can also continue to use them as normal dropdowns without typing anything.
This functionality behaves a little bit different in various browsers, but should be pretty similar. In Firefox, Chrome and Edge you will also have an icon inside the input box of a arrow pointing downwards. This icon can be clicked in order to display the dropdown, Another way of using it as a dropdown is to first click to select the input box and then click again to get the dropdown choices.
This functionality is available in “Create -> Group”, “Create -> Computer”, “Manage -> Modify -> Permissions -> Add”, “Manage -> Modify ->Permissions -> Edit”, ““Control -> Computer” and many other places. Whereever you need to select from a dropdown it is a high likelihood you also can search by typing part of words:
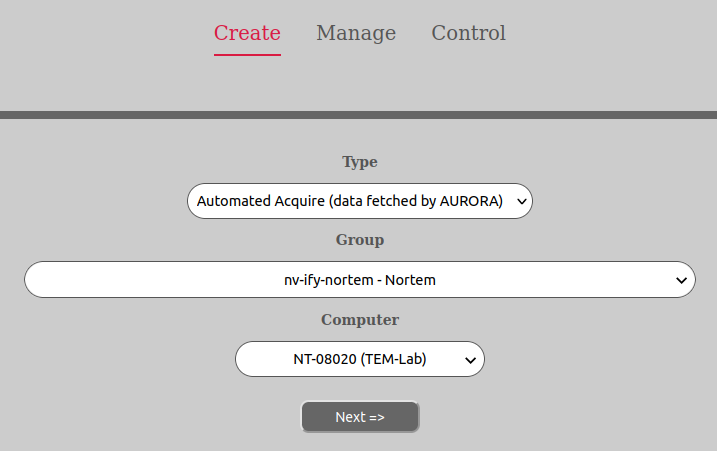
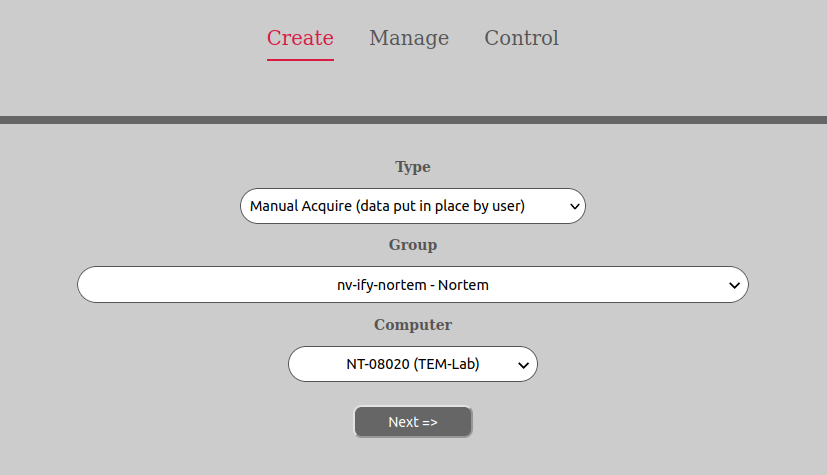
There are two storage modes supported by the AURORA-system called automated acquire and manual acquire respectively. Automated acquire means that the dataset is retrieved after is has been created or finished. Manual acquire means that the data for the dataset is stored as it is being generated by the laboratory computer. Now, these two modes are not completely mutually exclusive as it is possible for a manual acquire-dataset to store its data several times over interrupted periods of time.
So the difference is that with an automated acquire-dataset the data is fetched in the background and after is has been generated. After the data has been fetched in the background the dataset is automatically closed by AURORA and no more data can be added.
With a manual acquire-dataset a storage area is opened in RW-mode when the dataset is created (typically available through Samba/CIFS). The user can then either at the same time as generating the data, store it on that storage area or he/she can copy data there in separate instances over time before manually closing the dataset. In any case the data will have to be put there in some way by the user (either manually or telling the software to store on a share to that area) and usually through eg. samba/CIFS. When the dataset is closed, no more data can be added to it, just as with the automated acquire-dataset.
After a dataset has been closed (both for automated acquire- and manual acquire- datasets) the distribution-phase of the data collection is executed. The data is then distributed to the locations specified in the policy for the computer in question. If no policy is defined, no distribution takes place. But the distribution phase enables the user or research group to automatically have the data distributed to other locations, either for storage and/or processing. Please note that if distribution happens or not, the data is still stored in the AURORA-system.
Automated acquire transfer or copying in the background after the data has been generated is performed in the following way:
We generally recommend that you fill in the “Description”-field as a minimum beyond what might be mandatory by the template.
Mandatory fields will be shown with an orange coloring.
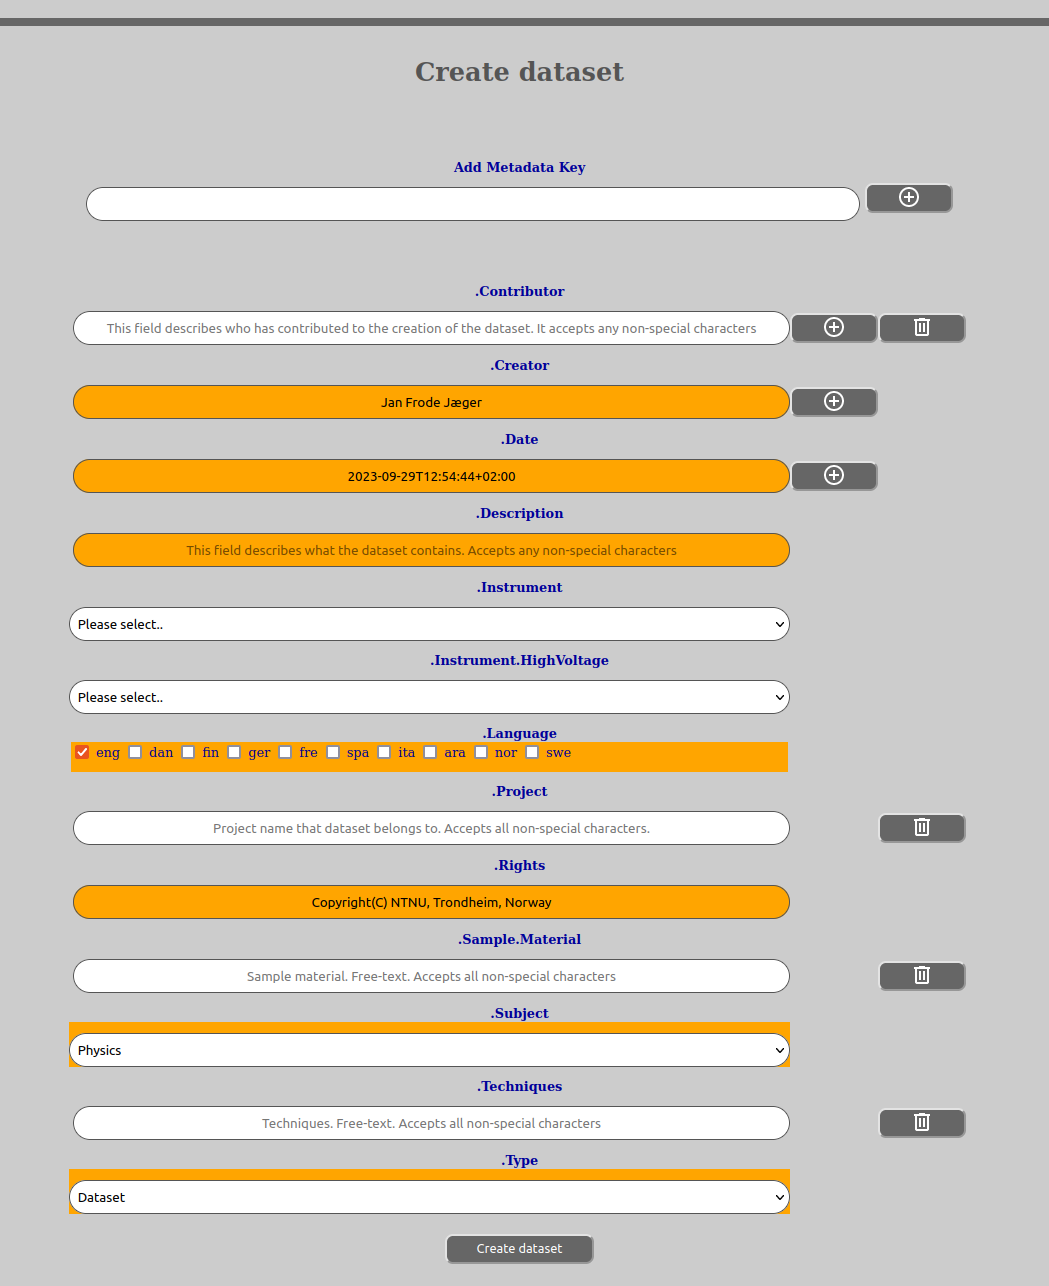
Information about the field can always be gotten for fields that have it by clicking on the title of the field. It will show constraints that are in effect for the field.

Manual acquire transfer is the copying of data while it is being generated. But it also allows for adding data over several separate instances in time and requires the user to manually close the dataset. It is done in the following manner:
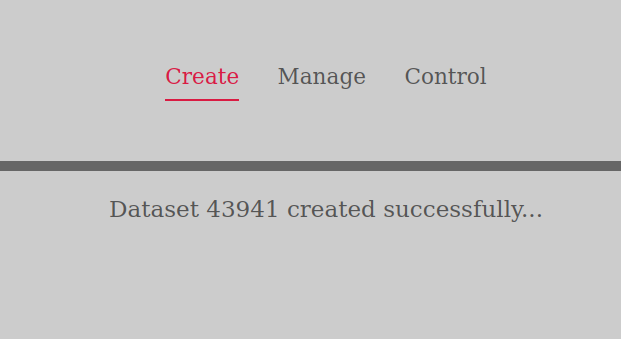
If all the metadata was entered correctly you will get a message saying the dataset has been created.
You are always able to click on the field title and it will open a dialog that show you what constraints are in effect for the field. This will allow you to make proper corrections.
The user will now have a dataset that is created and in an open state. It can be accessed through any protocol that the AURORA-system offers for its storage area, but typically one would use Samba/CIFS (see chapter on the FileInterface for more information).
When you are finished transferring data to the manual acquire dataset, you need to close it by doing the following:

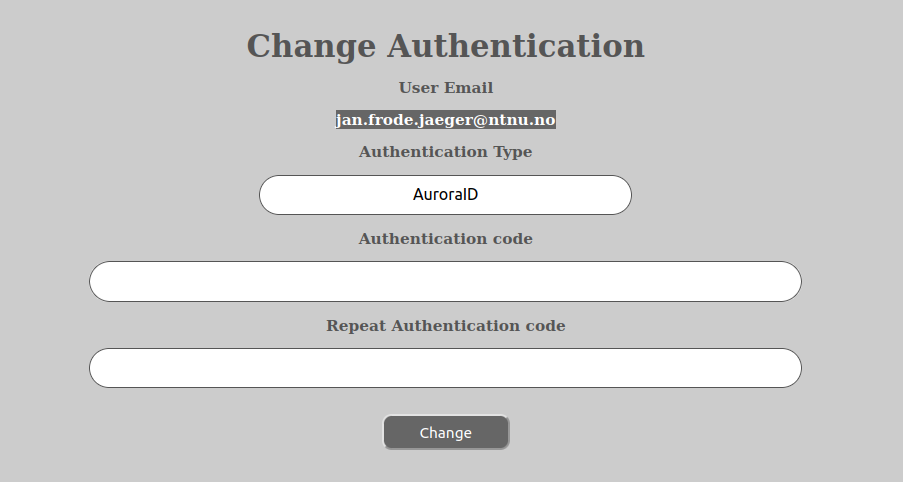
If the user has a need to change his or her password (in any of the available login methods, except FEIDE or any other external authentication authority) this is done by first logging into the AURORA-system and then doing the following:
A message will appear confirming any password change.
Please note that the AURORA-system allows authentication to happen through several methods and that the password that are changed in this procedure is only for the main, internal Aurora credentials called AuroraID (if not any other was selected in the first window above).
For authentications methods that are trusted by AURORA and that happens through other services, like FEIDE, you have to change the password for that in the way prescribed by those systems. They will not affect the credentials for the other authentication methods.
To manage datasets that have been created go to the Manage-tab.
Here the user will see a list over the datasets that one has access to (to view, read data, read metadata etc.), moderated by potential search criterias.
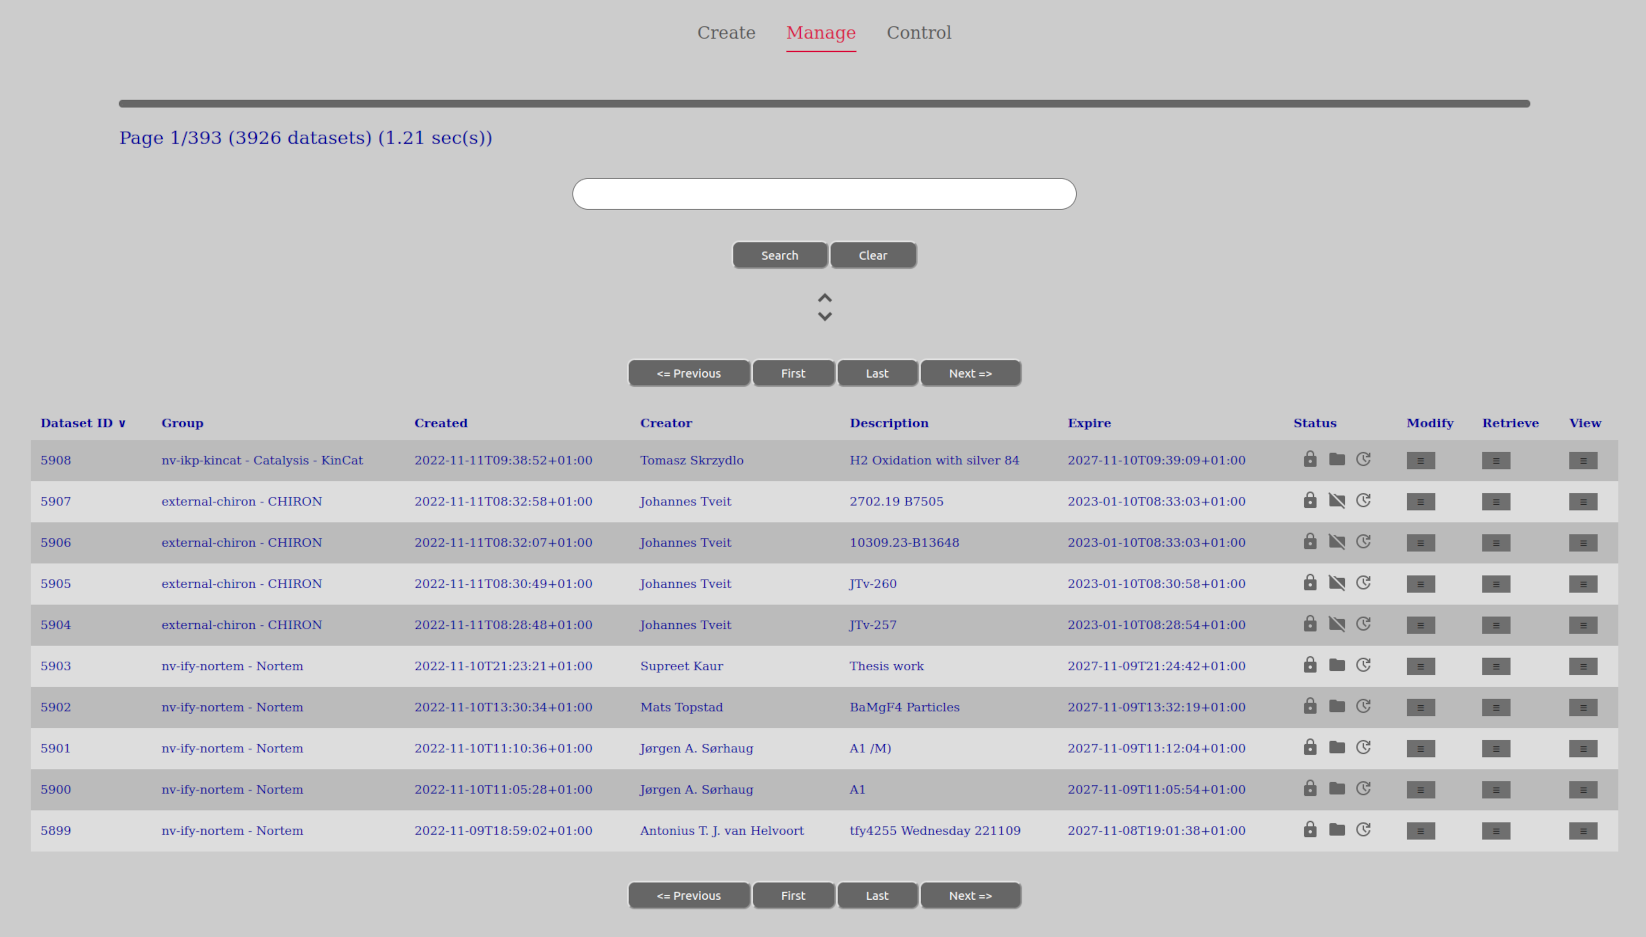
All entries in the “Manage Dataset” have a separate column for “Dataset ID”. This is the unique identifier for a dataset in question and are used everywhere in the AURORA-system to identify it and it is even used by the file interface (such as on the Samba/CIFS-share).
Please also note that what choices are available in the drop-down menus in the “Manage Datasets” view (modify, retrieve or view) are entirely dependant upon what phase the dataset is in (open, closed, acquiring etc.) and what permissions the user has. To get more permissions than what you might already have - talk to the laboratory administrators or research group admin.
The status-column show icons for the state of the dataset. The dataset is either in an open (orange, open padlock) or closed (gray, closed padlock) state. Furthermore the data of the dataset is either present locally in AURORA (gray folder symbol) or not present locally in AURORA (gray, crossed out folder symbol). By being present locally means that the data is stored in any of AURORAs storage areas. If they are not present locally, they might still exist somewhere else outside of AURORA.
In addition there is a automated symbol (gray, round arrow with a hour- and minute hand in the center) that are either crossed out or not. If it is crossed out, it is a manual dataset and if it not crossed out it is automated. This will quickly tell the user what way of acquiring/storing data on the dataset has been selected at the time of creating it. Because of this It will also tell the user if the dataset is still waiting for data to be put manually to it while being open, versus an automated dataset still working on acquiring the data for it. It will also show why eg a “close”-option is not available for an automated set beyond a permission issue, since manual closing is only available for manual datasets. Automated datasets are closed by AURORA when it is finished transferring data in the acquire-phase.
The datetimes in the AURORA Web-client is shown in ISO-8601 format and with any timezone information that the client is able to get from the browser. If no timezone information is available or the timezone is 0 (effectively no offset), the time is displayed in UTC and postfixed with the letter “Z” for Zulu or UTC.
The ISO-8601 specification will show the time in the following way (all examples are the same datetime):
2020-05-17T08:00:00Z
2020-05-17T09:00:00+01:00
2020-05-17T10:30:00+02:30
Here the year is first (2020), followed by the month (05) and ending in the day (17). Then a T-notifier comes signifying that the time comes, and the time is specified in normal 24-hour notation with hour:minute:second. The whole datetime is postfixed with the timezone information available (as required by the ISO-8601 specification).
The AURORA REST-server exlusively works in UTC-/unix-datetime, so any conversion going in and out of the server is done by the web-client. So any datetime coming from the REST-server has its timezone added or subtracted to the unix datetime before being converted and shown as ISO-time strings.
This option is dependant upon the user having the DATASET_DELETE-permission on the dataset in question and that the new expire date he seeks to set is allowed within the current lifespan policy in effect in the entity tree (see the How to set dataset lifespan for more information on lifespans).
There are two stages at which an expire date can be set and those stages relates directly to the phases of a dataset:
There is a separate policy for changing expire-dates when the dataset has the status OPEN as compared to when it has the status CLOSED.
For those users fortunate enough to have the DATASET_EXTEND_UNLIMITED-permission on the dataset in question can extend beyond any restrictions imposed by the lifespan-policies.
In order to change the expire date of a dataset, do the following:
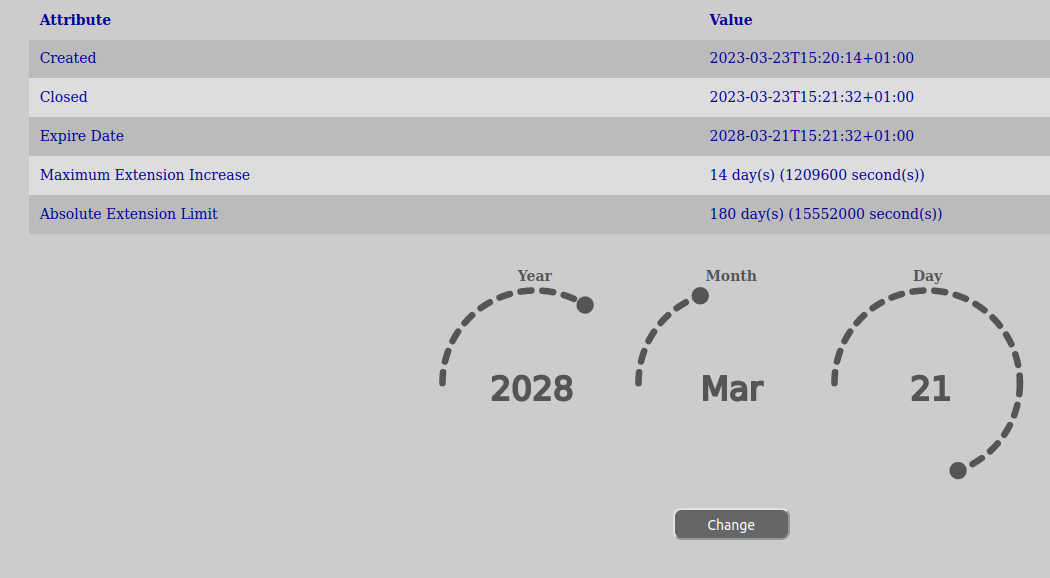
You will receive a feedback after clicking the change-button if it was ok or not and what the new date is.
This option is dependant upon the user having the DATASET_CLOSE-permission on the dataset in question.
In order to close a dataset, do the following:
This option is dependant upon the user having the DATASET_CHANGE permission on the dataset in question.
In order to edit a datasets metadata, do the following:
Please note that mandatory keys (must be filled in) are shown with an orange coloring o f the field.
All keys that can be added to or removed will have a add-symbol (circle with a plus) or a delete-symbol (trash can) behind them. This is to remove the key completely or to add or remove extra values on a given key.
It is also important to remember that when you choose to edit metadata, the metadata keys and their values that you see are not only the ones you saved, but also the ones that comes from any template(s) in effect. If you want to see which of the metadata are actually saved, you need to choose to just read what metadata has been saved (see How to read metadata). Then no templates in effect will be added.
Editing metadata will be possible as long as the data of the dataset exists and the dataset has not been removed. When the dataset has been removed, the metadata will no longer be allowed to change.
You can also add new keys to the metadata that are not defined by the template(s) in effect. You can do that by:
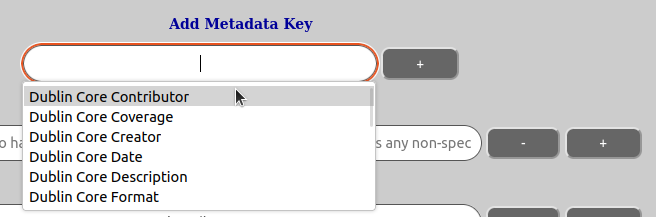
Allowable characters in a metadata key name is: a-z, A-Z, 0-9, “.” (period) and “-” (hyphen). Please be careful with adding metadata keys outside of template, as it is desirable that users add data on the same metadata keys to ensure sensible searchability. We suggest that if you have long-term needs for certain metadata you should notify your lab administrator about this so he can ask the system operator for this to added in template, ensuring correct metadata namespace allocation as well as use.
This said, you can customize your own metadata keys by manually adding them. Also remember that for normal metadata namespace, all keys have to start with “.”, so eg. “.ThisAndThat”, “.MyKey” and so on and so forth. The reason for this is that everything before “.” is system metadata and not accessible for users in a normal way and should usually not be addressed. You will be allowed to add system metadata keys in the metadata editing window, but they will be ignored and removed when updating the dataset through the AURORA REST-server.
For more in-depth information on how metadata and metadata keys work, please consult the chapter called How to edit template.
In order to edit dataset permissions do the following:
The rest of how to edit the permissions themselves is performed in the same manner as for other entities and this can be found in the following chapter How to edit permissions
In order to read the metadata of the dataset (read-only), do the following:
All the metadata will be protected and the user unable to change its values.
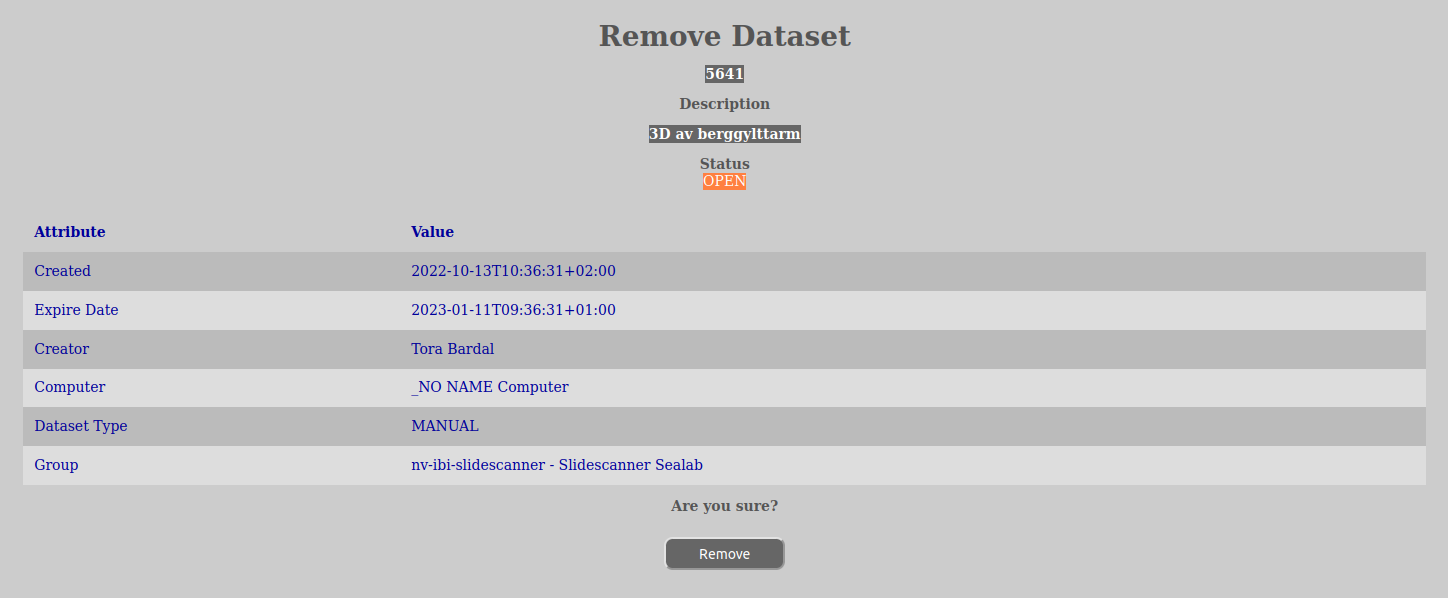
This option requires that the user has the DATASET_DELETE-permission on the dataset in question.
Performing this operation will not immediately remove the dataset, but instead start a voting notification-process where the users have to vote if it is ok to close the dataset. If no voting happens and the notification-process escalates up to the top of the entity tree the maintenance-service will cancel the removal process if the expire-date has not yet been reached.
Please note that even if it the dataset is removed, it is not actually deleted, but moved away from the user and kept for a certain time before being actually deleted.
In order to remove a dataset, do the following:
This option requires that the user has the DATASET_CREATE or DATA_CHANGE-permissions on the dataset in question.
When selecting this choice in the modify-menu, the user will be presented with a screen that shows every registered dataset distribution tasks. It will show its current phase and status, how many times it has been retried and a comment that gives a closer explanation. At the end of each task row, you will see two icons: a play-button and a stop-button. These two allows you to start- and stop the distribution task in question if possible (you might get an error message saying it is not possible and an explanation).
All distributions of dataset data follows certain phases and in most cases those phases are:
You cannot influende these phases as they are part of the definition of what a task is supposed to do. The only thing that is possible to influence is to start- or stop a task from running.
The retry count tells you how many times a task has retried to execute the phase it is currently in. After a certain number of retries the task will fail permanently and only a manual start (by the user) will retry the task again. The retry count is default set to 2, but can be changed system-wide by the AURORA system administrators. A retry count of 2 means that by the time it reaches two retry counts, it will have tried to execute the phase 3 times (the first time does not count as a retry). This retry count is not accumulative over the phases and it can also be reset if the user stops and starts a task.
If a task finishes successfully, you will no longer be able to see the tasks in this view anymore. It will be permanently removed.
In order to influence what is happening with the dataset data, you can either attempt to start or stop tasks by clicking their respective icons to the right of each row of task data.
The button at the bottom of the screen called “Refresh” will manually refresh the overview of the distribution tasks.

If you want to avoid learning the nitty-gritty details of regular searching, you can perform a much easier quick search that covers all the basic fields that you see when the datasets are displayed in the list of the Manage-view (Dataset ID, Group, Created, Creator, Description and Expire).
In order to this, do the following:
To reset the search click the “Clear”-button and then pressing the Search-button to execute it.
Also remember that the current executed search (by pressing search) is saved in the cookies of your web browser and will also be available the next time you go into AURORA.
The manage-tab view has a rich ability to search for datasets based on metadata values. In order to open the search dialog with options for searching, click the expand-symbol below the search-button.
Then several choices will be available to you:

“Results per page” is the number of datasets to show per page in your search result. You can change this by entering a new number or using the buttons on the input dialog to go up or down. In order for a new value to be used, you have to press the Search-button afterwards-
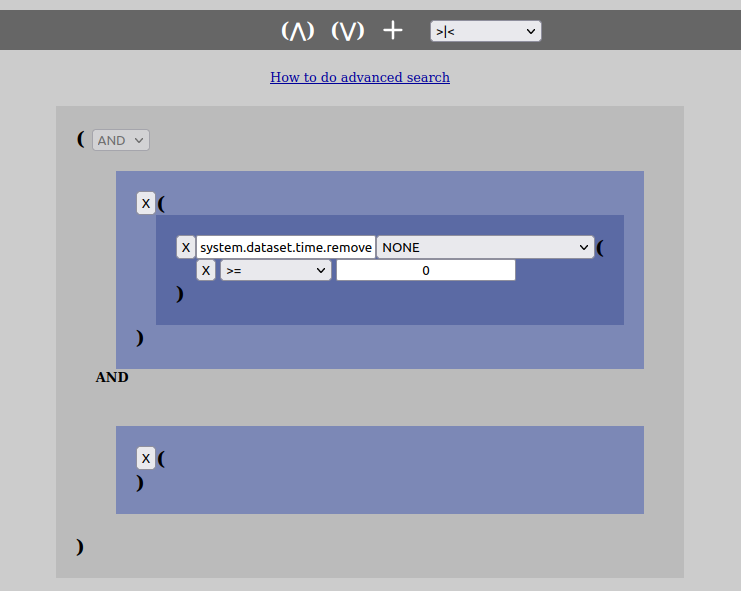
Now, in order to search one has to add statements to the structure that are shown on the screen. It consists mainly of “OR”- and “AND”-statements.
The advanced options toolbar for editing the search structure, basically has 4 tools:
To add these various components to the structure, left-click once on the area you want to add it to and then press the toolbar symbol of choice. When it comes to key-names, they can be written or chosen through an input field and even easily changed later. The OR-groups comes in shades of gray coloring, while the AND-groups comes in shades og blue coloring in the web-client.
Please also note that it will always exist an “OR”-group set to be “AND” that contains the operator for ensuring the presence of either “including” or “excluding” the removed datasets or not in the search result. This can be chosen from the dropdown-menu on the toolbar.
The difference between an AND-group and an OR-group lies mainly in the fact that a pure AND-group cannot be changed to anything else and that it contains a set of key->value conditions that must all be true for the AND-group to be true. In addition an OR-group can never contain key->value pairs. As noted above an AND-group will be colored in shades of blue, while OR-groups will be colored in shades of gray, making it easy to pick out which is which.
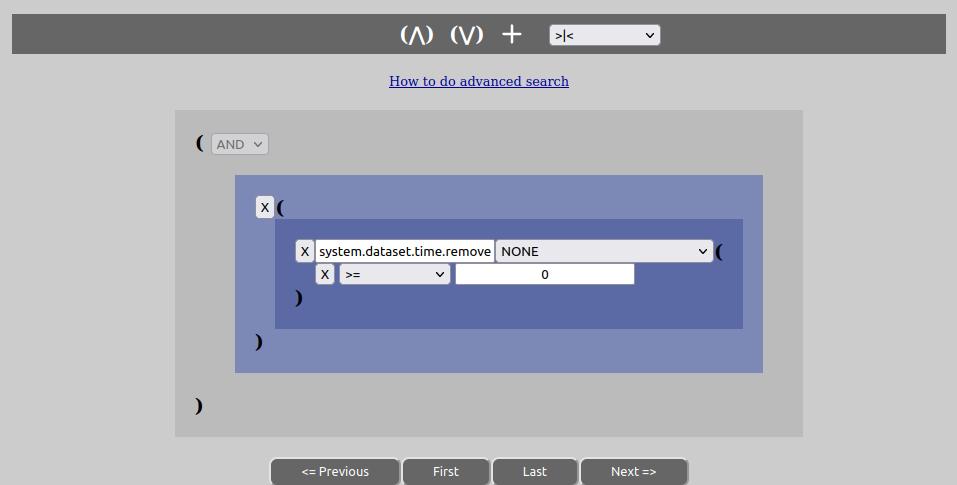
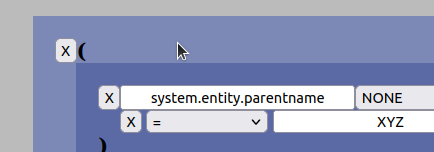
So, lets say you want to search for all datasets that are owned by a particular research group called “XYZ”. The key one is then looking for is the key called “system.entity.parentname”. In order to create such a search structure, do as follows:

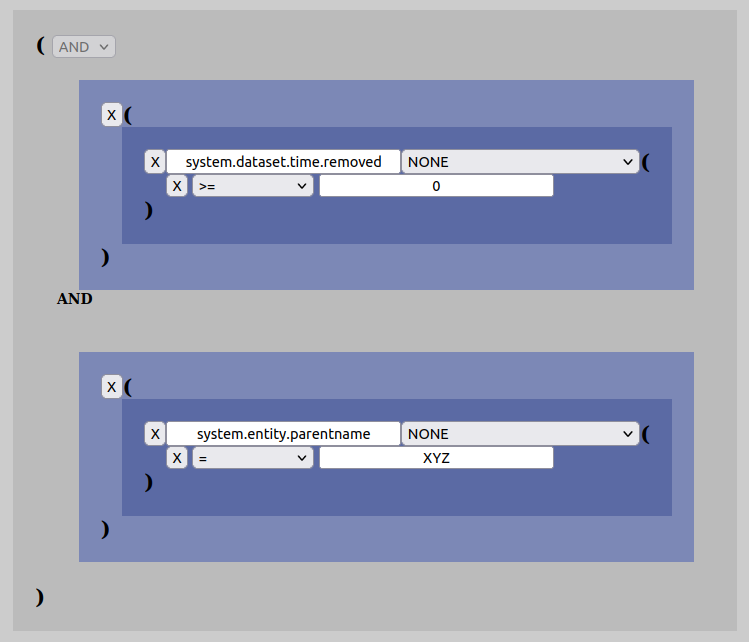
Please also note that the input-box supports values with wildcards (“*”) and by using this one can write partial values for what one is searching for. Eg. instead of writing just “XYZ”, one could write “XYZ*” and search for everything that starts with “XYZ”.
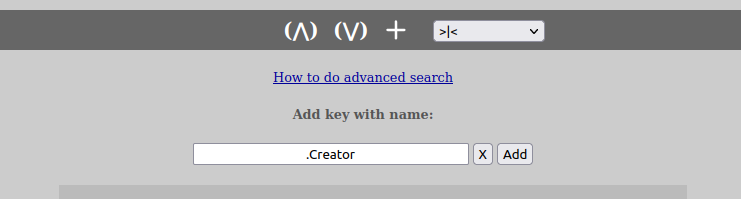
Now that one have already added an AND-group it is easy to add more search criteria. Lets say that in addition to searching for the group “XYZ”, we also want the search to match all datasets that has “John Doe” as the creator (Dublin Core “.Creator”-key):

Please also note that all searches done in the “Manage”-view will only return results based upon the permissions of the user doing it, no matter the logical structure of the search.
As one can see from previous examples, all the added keys contains a separate dropdown to the right of the key name:
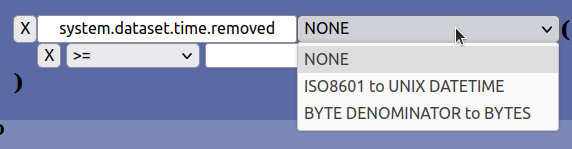
This dropdown is the filter. The filter is used to convert a value specified for a key according to some conversion scheme. The ones that are possible to select at the moment is: NONE, ISO8601 to UNIX DATETIME and BYTE DENOMITATOR to BYTES. NONE is the default and means that no filtering is done on the value specified for the key in question. In most cases this selection will suffice.
However, certain values in the dataset metadata are special values that are not practical to specify manually and where a suitable abstraction will help (such as converting textual ISO-time to unix datetime used inside the database for several metadata values).
Here is an example of how to convert between ISO8601-time and Unix Datetime by using a filter during search:
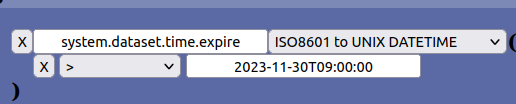
The value for the key above will be converted from ISO8601-time to unix datetime before giving its value to the AURORA system during searches. The filter also support specifying time without hours, minutes and seconds and even without using the T-separator between date and time. Valid examples:
and so on and so forth.
The BYTE DENOMITAOR-filter can convert between byte denominators and the same value in Bytes. This is practical when eg. using the dataset-size key which is stored as a Byte value:

Valid Byte-denominators are:
As one can see, both single and double letter denomitaors are accepted. It also accepts the denominators in both lower- and uppercase.
Certain notifications or actions in AURORA will prompt a voting process by the Notification-service. As of writing this happens when a dataset has expired for closing or for removal. It will also happen if a user asks for the dataset to be removed.
A voting process is a mechanism whereby the users vote for a certain action to take place, in this case removal or closing of a dataset. When users receive a notice about such a voting process, the notice (eg. an email) will contain voting information as well as a link to cast your vote(s). If enough votes are cast by various users the notified action will be executed.
The reasoning for this process is that we do not want certain actions to happen in AURORA without proper approval, especially not removal. Using a voting system also allows for a certain flexibility in how a research group specifies what votes their users have. The number of votes required to perform one of the actions are globally defined by the AURORA system. The only thing the research group can do is to specify the vote distribution among their users (some might not have any votes at all).
If no voting is performed in the event of a voting process, the notification will in time be escalated to the next level in the AURORA entity tree and whoever has votes on this level can also vote or take action to stop the process. Escalation will continue until the issue is resolved or it reaches the top of the entity tree, whereby the following will happen:
As mentioned earlier the voting process involves escalations up the AURORA entity tree if no one votes or takes actions to stop the notification. The escalation process works as follows:
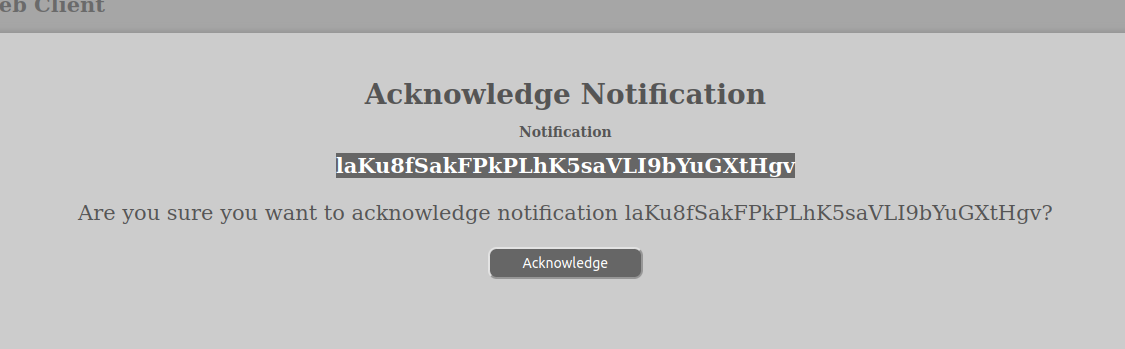
When a notice is sent to user(s) it will in the case of a voting-process contain a message that includes the voting/acknowledgement information:
This message requires voting in order for it to be accepted. We need you to vote on it by clicking on the link below (you are not to enter any information on this page):
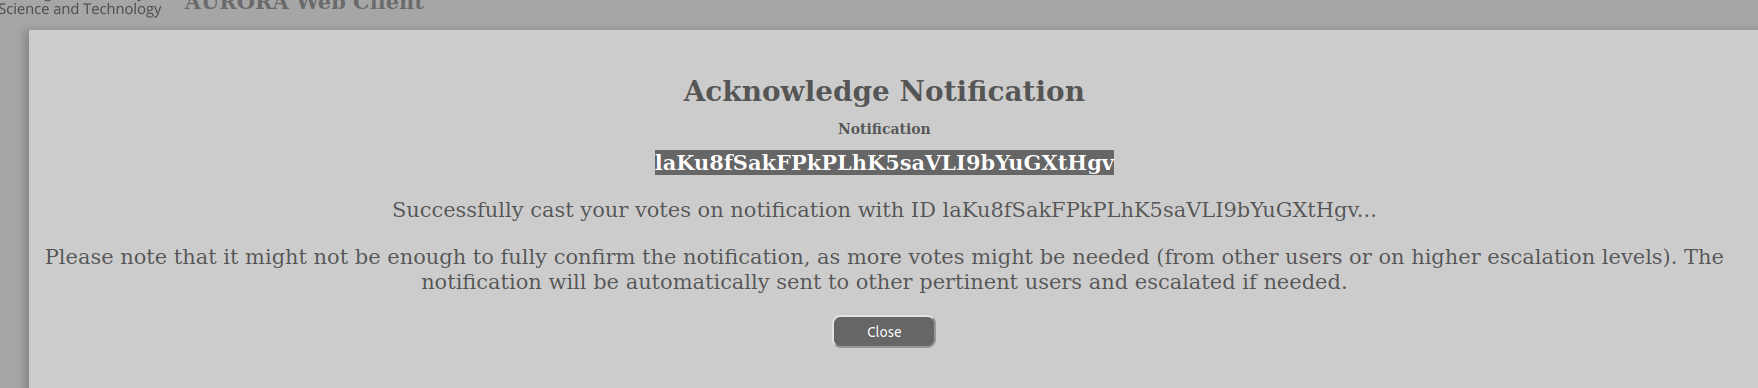
https://www.aurora.it.ntnu.no/?route=ack%3Fid%3DlaKu8fSakFPkPLhK5saVLI9bYuGXtHgv%26rid%3DoRGR9uMKwAi5zGd0QOGBxtsveXyAjx1DWhen you choose to vote to execute whatever this message is about, you will be sent to the confirmation page of AURORA. There you will be asked to login if you are not already logged in and then you will be asked if you wish to acknowledge the notification or not?
When you confirm the web-client should return with a message saying that it was successful or not. Usually, we hope, successful:
We would like to underline that the AURORA voting process is completely performed by digital ballots and we do not foresee creating support for any physical notices whereby a mail-man will knock on your door and ask for physical ballotting. Reaching the required votes in a voting process is completely by popular vote. No voting-processes are rigged, faked or otherwise stolen. Except, we guess, that the research group administrator might be construed as having a heavy leaning towards giving certain members more votes than others or when AURORA keep the current dataset because of lame duck events and no or enough voting has taken place. This we call enlightened rule.
This option requires that the user has the DATASET_LOG_READ-permission on the dataset in question.
There are many reasons to want to read the dataset log, but some of the most common will be to check on the progress of the Store-service. This is especially the case during the acquire-phase of Automated sets.
In order to view the dataset log, do the following on the “Manage”-tab:
The loglevels go from DEBUG all the way up to FATAL, where DEBUG gives you the most detailed number of logged entries, while FATAL will give you the least (if any). As default the log view is set to INFORMATION-level log entries.
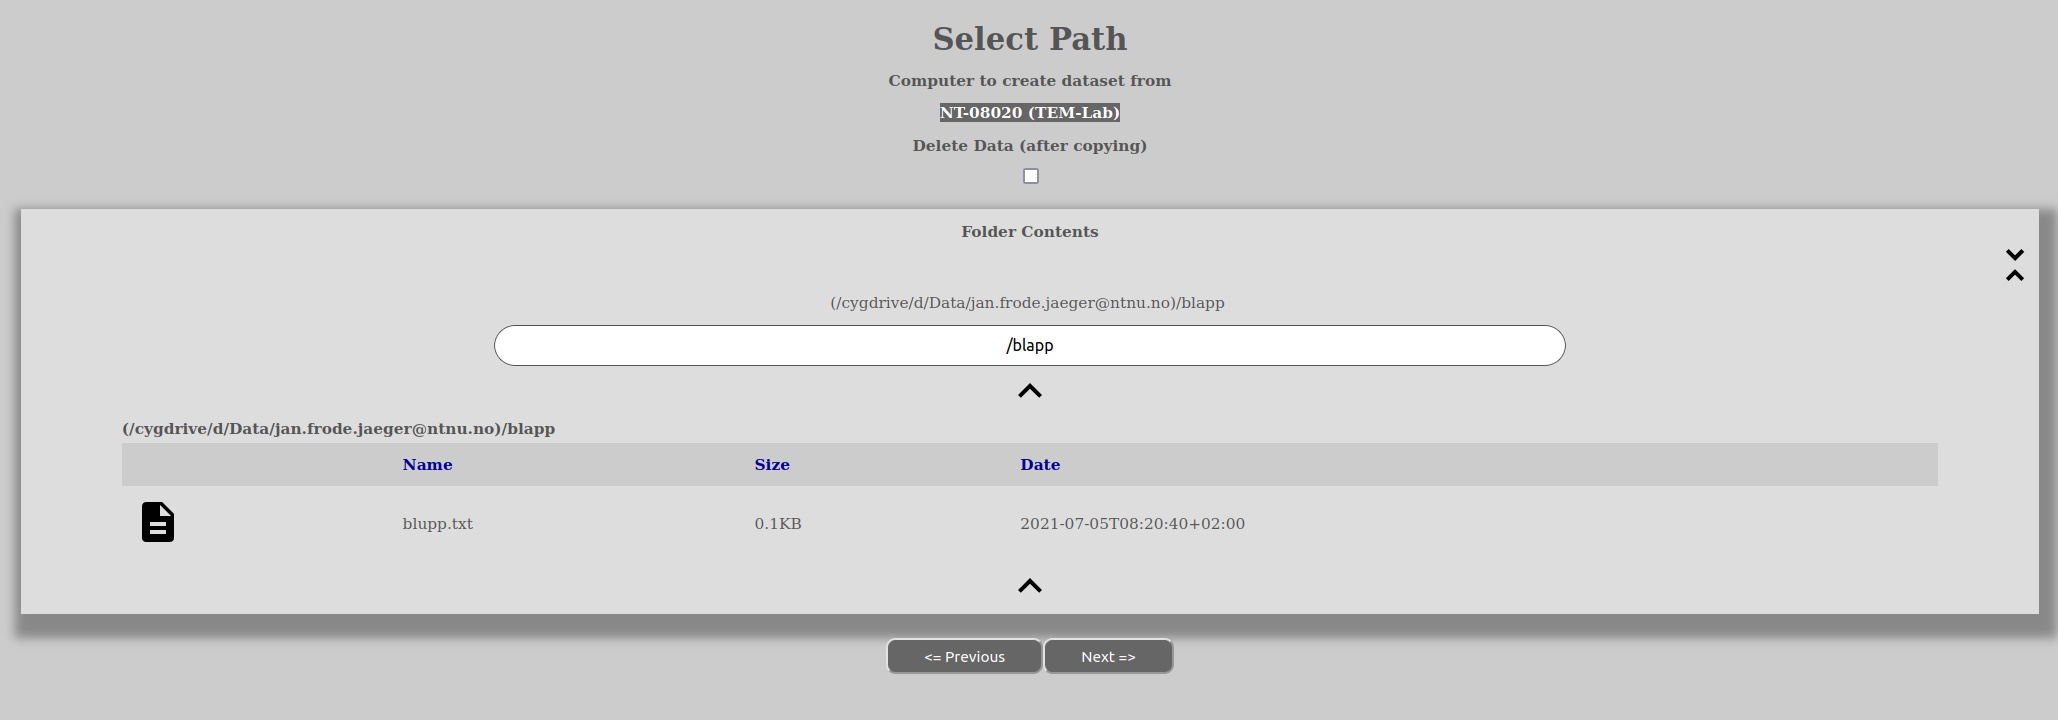
The primary way to access the data of AURORA datasets is the socalled file interface.
SMB mount the interface by right-clicking “My computer” and select “Map network drive…”
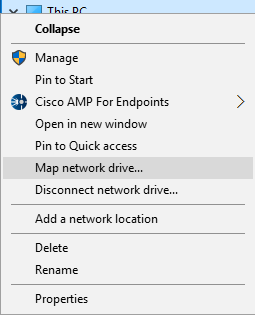
Type in path “\\fagit.it.ntnu.no\aurora” and select drive letter

Authenticate if asked
The Aurora fileinterface is available on login.ansatt.ntnu.no at
/fagit/Aurora/view/access/user/
You may mount the fileinterface on your local computer similar to the description in Mounting (in windows).
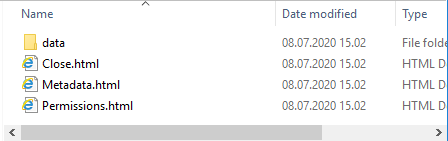
In the top folder of the connected drive you will find
datasets - all the datasets you have access to by creation date, name and ID. (2)
ALL - a folder containing all datasets you have access to by dataset ID.
selection folders - folders containing personalized selection sets. (2)
*.html - web shortcuts into the Aurora web interface. (1)
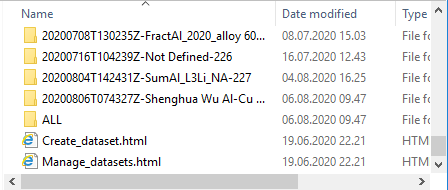
Use the Create_dataset.html to create new datasets.
A dataset folder will contain
data - a folder where the actual data of the set resides
*.html - web shortcuts for this dataset.(1).
additional files and folders not described here.
The “data” folder is where the actual data resides. You may change the the content of this folder in the usual ways for open datasets. Open datasets is dataset created as “synchronous” and not yet closed.
The .html extension may be hidden by your operating system, but the .html files could still be recognized by a web browser icon.
The selection set mechanism is not yet implemented. When implemented you should be able to tailor the selection folders as well as the top folder.
There are several ways of accessing the data of a dataset. AURORA defines a concept called “Interface” that gives you various ways to access your data.
To see which interfaces that are available for your dataset:
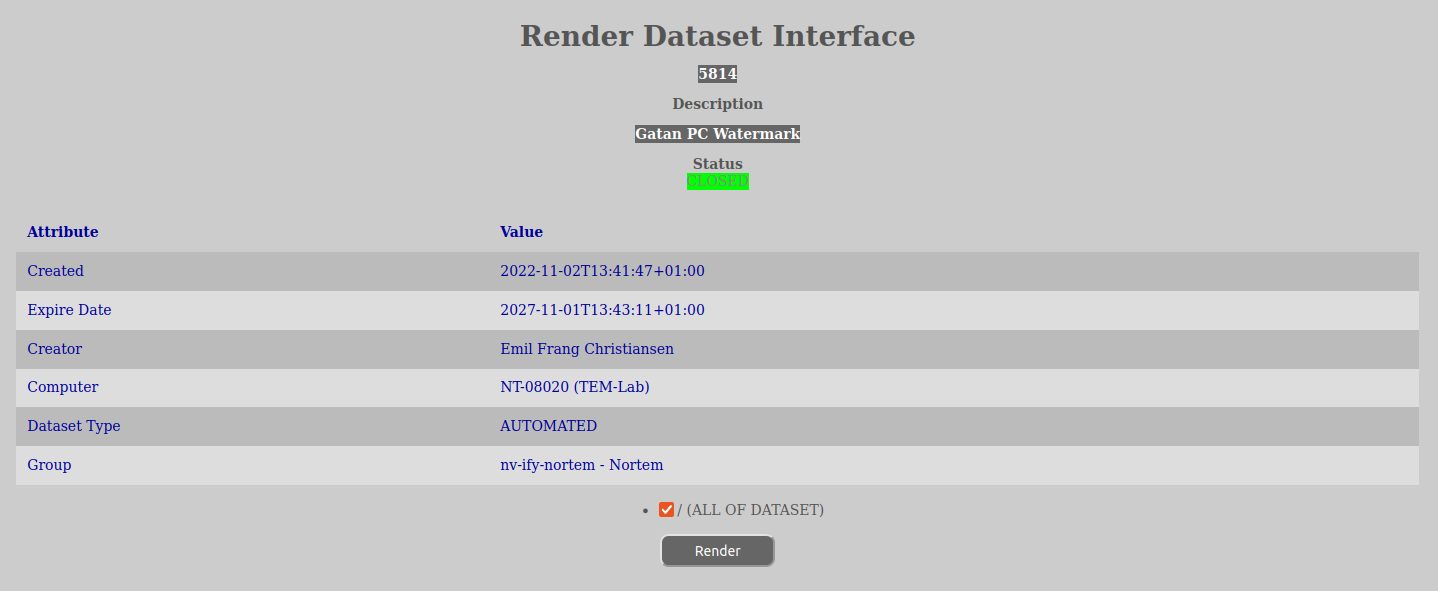
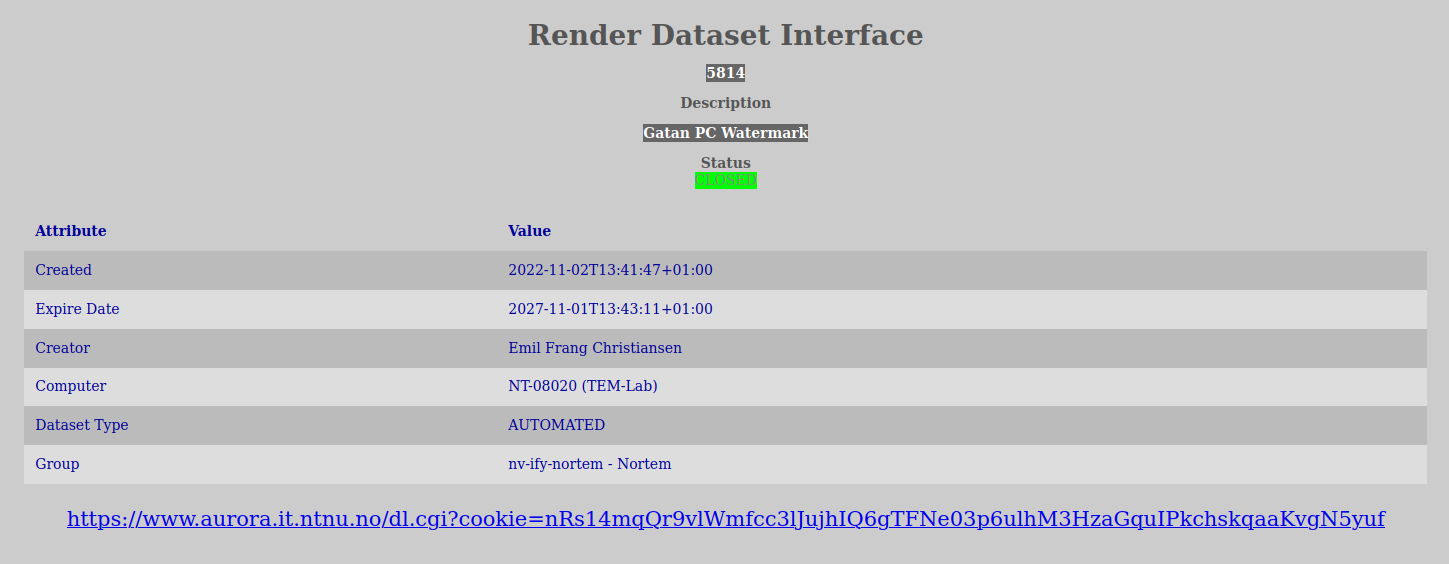
Sometimes the rendering might take some time, especially in cases like with zip- and tar-sets. It is advisable to keep the render-tab open in the browser and refresh it once in a while until it is has a ready rendering. The reason for this is that the information that you get back is closely tied to which folders you select to render and are dependent upon you selecting the same folders in order to see the rendered interface if you go back later.
When an interface is finished being rendered information about how to get the data will be displayed on the screen.
Please also note that all of your datasets will always be accesible through various standardized protocols such as Samba/CIFS (please see the File-Interface chapter of this document).
Some interfaces will not be available to users outside of NTNU. An example of this are the samba-shares that require an NTNU-account/username for authentication.
AURORA includes functionality to open up a tunnel from a user-computer, to a lab-computer. This for controlling experiments in the lab from a remote locations. The remote control protocols supported, can be defined flexibly in the AURORA templates, for any given computer. Common protcols are, RDP and VNC.
This functionality relies on a gatekeeper-service located on another server and that are utilized by AURORA.
To use this capability you need to have the COMPUTER_REMOTE-permission on the computer. If you do not have that permission, please go cuddle your laboratory administrator for permission.
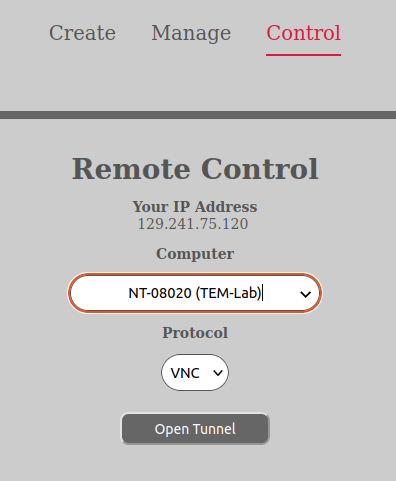
If you wish to open a tunnel for a computer you have, you can do the following:
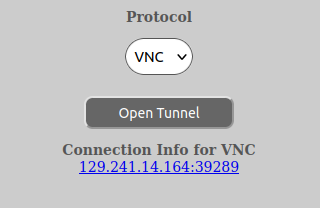
A new window will appear with the information to utilize the new tunnel. Please note that you have to start using the tunnel within 10 minutes or it will close. After you have started to use it, it will stay open until you close your remote control software or the software looses its connection. At that point, one would need to open a new remote control tunnel to continue working.
The remote control tunnel is only valid for the computer you opened the tunnel from, as stated in the “Your IP address” field in the image above.
In addition, for RDP and VNC connections one can click the link for the new tunnel and download a auto-generated shortcut file for either RDP or VNC.
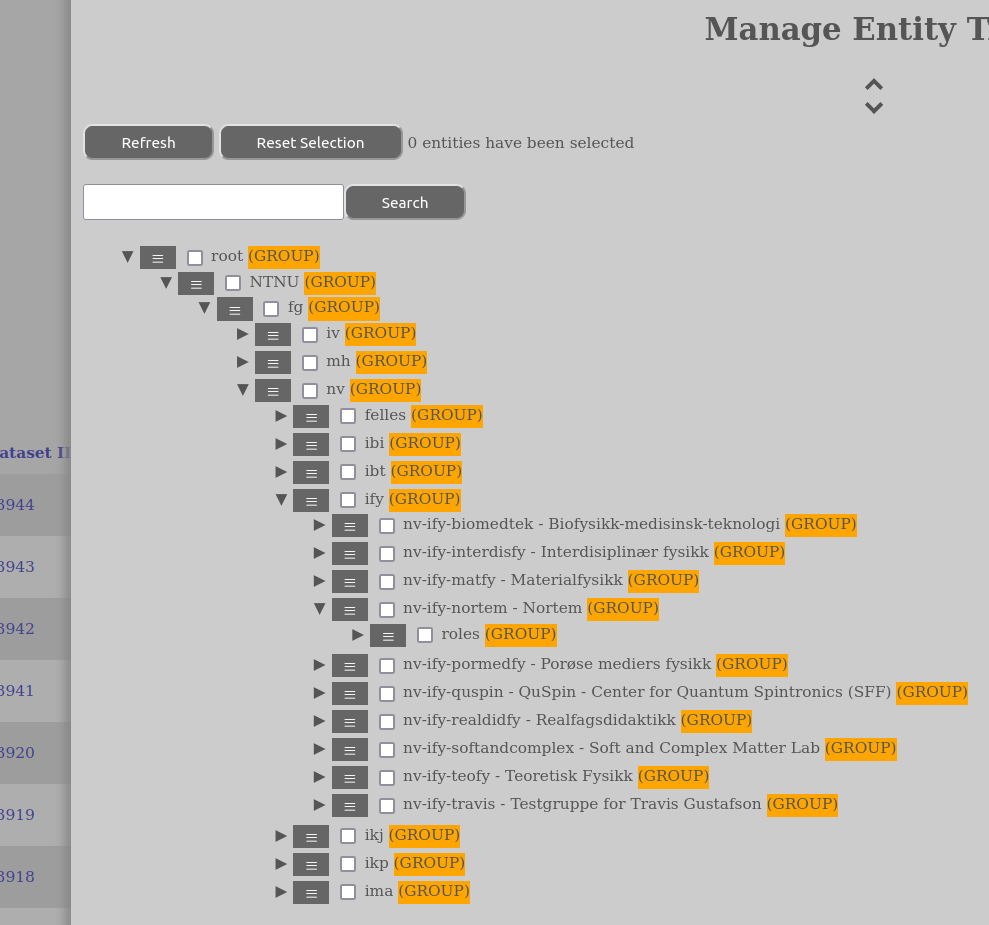
AURORA has the ability to define and mange an entity tree of the various parts of the system such as USER (for users of the system), GROUP (organizational/logical and roles), TEMPLATE (for defaults and enforcement of settings in the entity tree), STORE (for various ways of transporting data), COMPUTER (for devices that generates data) and INTERFACE (for ways of accessing the data in the datasets).
The AURORA Web-client has a entity tree view where all of these entities can be managed. They can be created, moved, deleted, assigned permissions, edited metadata and so on dependant upon your assigned permissions, the restrictions inherit in the entity type and any possible templates.
These are some introductory concepts about how to work with the AURORA entity tree. It is especially relevant to those that have management roles in Aurora.
It should also be noted that the research group-, roles- and lab- setup described here in the entity tree is only a best practice recommendation that we are using at NTNU. AURORA itself it totally general and dynamic and one can easily create other structures and setup. But it is easy to get lost in the vast abyss of groups and permissions if one doesn’t know what one is doing. It is also a point to avoid too much granulation, which again increases complexity and potential confusion.
The basic element in Aurora is a called an entity. It has a type, a parent and a set of metadata.
There exists several entity types in AURORA, but those that are most relevant to user- and management roles are:
AURORA might also be confusing in the sense that it doesn’t differentiate between Group-entities that are pure organizational/structural entities in the tree and those that are socalled role-groups. To AURORA all of them are just groups and it is how you use them in the tree that makes the difference. This flexibility is also why we recommend as best practice to make the setup as easy as possible.
Entities are tied together with three different relations:
The parenthood forms a single noncyclic tree, but as a special case the root node is its own parent. Only groups can be parents, other entity types will be leaf nodes.
Membership associates an entity to another. It is directed, so assigning A as member of B does not make B member of A, but B may also be assigned to A explisitely. A child is considered a implist member of it self and its parent.
An entity has a set of roles. The roles is the cascading set of its memberships. Consequently A’s roles include A, all its ancestors, B and its ancestors, and all other memberships the any of them may have etc. Consquently all entities is member of the root.
Caveat: Assigning root as a member of another group will give the group role and any derived role to all entities. Care should be taken when assigning any higher level group as a member.
A set of permissions may be granted for an entity (subject) on another entity (object). Permissions will also be inherited from the objects parents, unless explisitly denied.
The complete set of a subjects permissions on a object is the union of direct or inherited permissions for all of the subjects roles.
The Aurora “basic goal” is to move datasets from a lab computer to a research group where it can be made available for the group members or others who need access to it. The management tasks is thus mainly to give the users the neccesery permissions for the operation.
The primary interface for management is the entity tree view. This is found by logging into the Aurora web page and select “Manage entity tree” from the dropdown menu in the top-right corner. The tasks is based on how NTNU currently has organized the structure, and may change if we manage to integrate Aurora with other systems and services, such as BookItLab (but, then this documentation will also change).
The tree references is given like “/NTNU/[ORGFAC]/[ORGDEP]/Labs/TEM-Lab” where the “/” separates the different nodes. The leading “/” is short for ROOT/. The elements inside “[]” is placeholders for the relevant entity, such as Faculty, Department, NTNU etc.
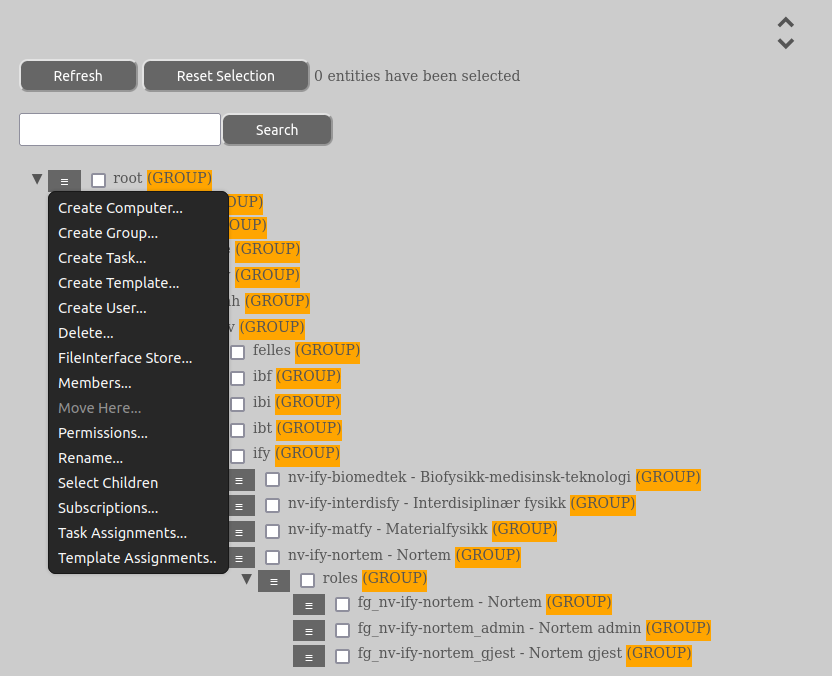
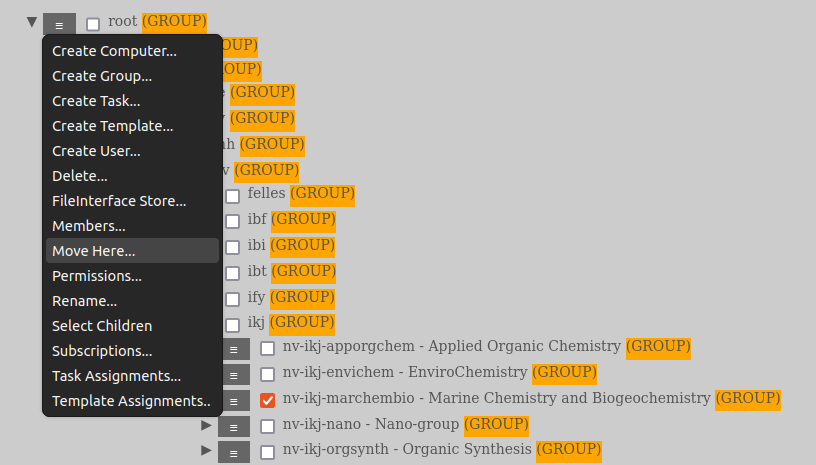
Left of the entity name there is a menu icon consisting of three lines. By clicking this you can select what to do with this entity.
Users are automatically created when they log into Aurora with FEIDE. This is the recommended way of creating users. They may however be created manually as a local user. Local users will then be matched with a FEIDE login if the email address matches.
Users is located in /ORG/users/email like “/NTNU/users/bard.tesaker@ntnu.no”. To create a local user select “Create User…” on /ORG/user/.
Roles are generally located in:
[ORG]/[ORGFAC]/[ORGDEP]/Labs/[ORGLAB]/roles
[ORG]/[ORGFAC]/[ORGDEP]/Research Groups/[GROUP]/roles
depending on whether the role is in relation to the computers of a lab or a research group.
For most purposes, research groups are created in the BAS group admin (https://bas.ntnu.no/groupadmin/) as fg_-groups and then automatically synced into AURORA. This is the case for all NTNU groups and users. However, sometimes external groups have to be created manually.
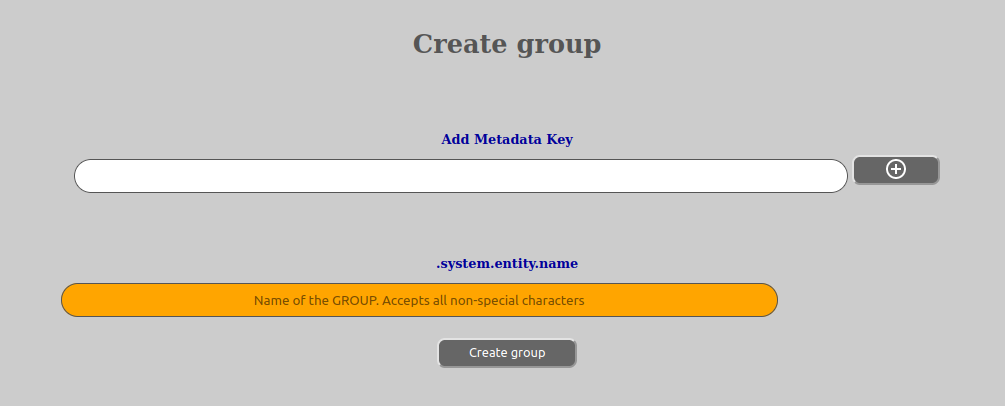
Create the group under:
[ORG]/[ORGFAC]/[ORGDEP]/Research Groups/Name it “[ORG]-[ORGFAC]-[ORGDEP] [group-name]” so it is uniquely identifiable in dropdowns etc.
We suggest three roles for the research group
Under:
[ORG]/[ORGFAC]/[ORGDEP]/Research Groups/[GROUP]/rolescreate the three roles like “[ORG]-[ORGFAC]-[ORGDEP] [group-name]_roles“, such as:
NTNU-NV-IBI Evolutionary Genetics and Fruitflies
NTNU-NV-IBI Evolutionary Genetics and Fruitflies_admin
NTNU-NV-IBI Evolutionary Genetics and Fruitflies_gjest
Then:
On the:
[ORG]/[ORGFAC]/[ORGDEP]/Research Groups/[GROUP]/rolesand its roles, select “Permissions…”. Grant the following permissions to the roles:
The lab is essentially a collection of computers. This is where the permission to read from the computers is granted
Create the lab with a descriptive name by using “Create Group…” under:
[ORG]/[ORGFAC]/[ORGDEP]/Labs/
Create a role as “[ORG]/[ORGFAC]/[ORGDEP]/Labs/[ORGLAB]/roles/[LABNAME]_user”, such as:
NTNU-NV-IBI Ethology Lab_user
grant COMPUTER_READ to the role on the lab in question, in the case above:
NTNU/NV/IBI/Labs/NTNU-NV-IBI Ethology Lab
Select “Create Computer…” on the:
[ORG]/[ORGFAC]/[ORGDEP]/Labs/[LABNAME]/
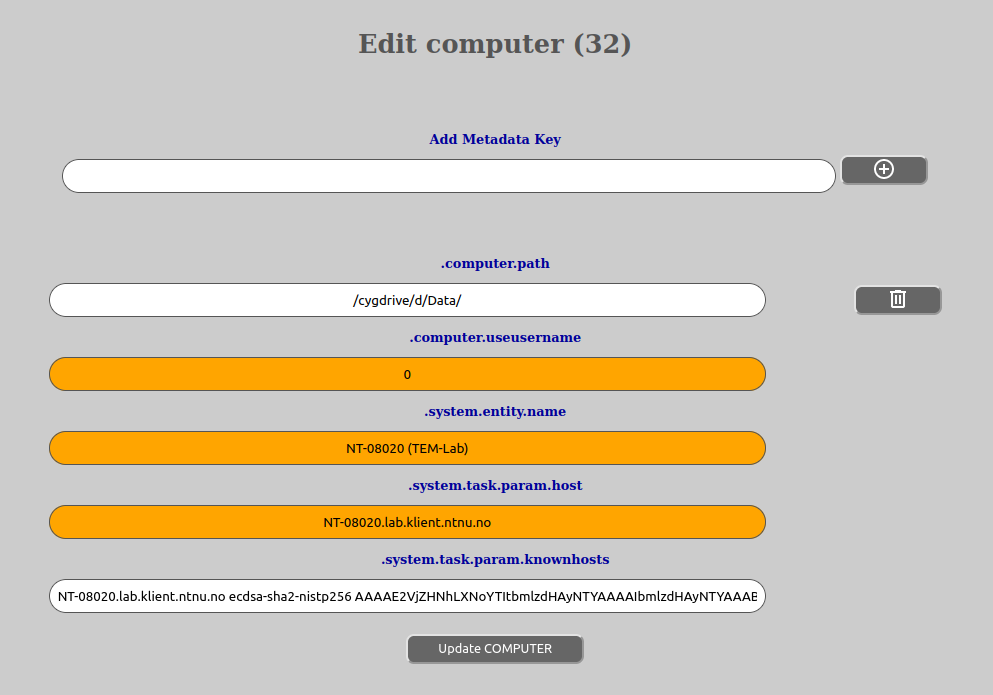
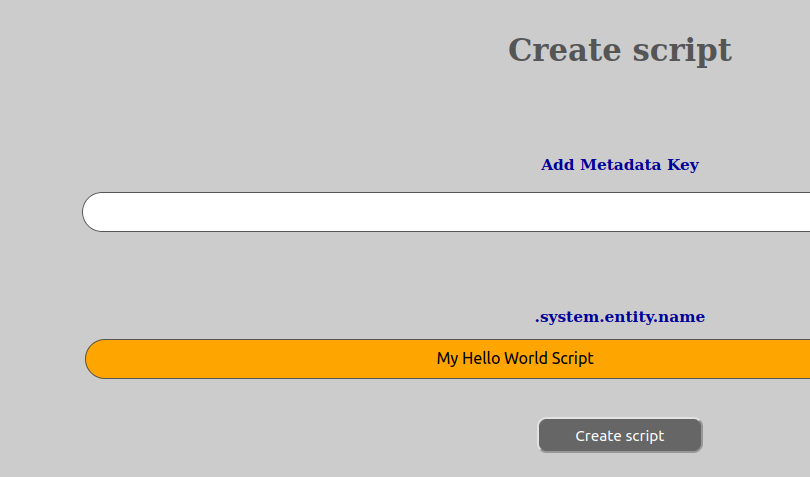
Fill in whatever metadata comes up, but particularly:
.computer.path
Local path to the data folder, for Windows-computers in “cygwin” notation, like “/cygdrive/c/data” for “C:”
.system.entity name
The computer name. We recommend a unique name, NTNUnnnnn if available.
.system.task.param.host
The domain name for the host, like “ntnunnnn.dyndns.nt.ntnu.no”
.system.task.param.knownhosts
Do so and copy result…. (TODO) - wrap a cgi (on app) around “ssh-keyscan host”
Press “Create Computer”
On all groups (both roles related and hierarchical/organizational ones) one can add members. These members will inherit any permissions or memberships that this group has. This makes it easy to manage which users get what permissions.
For most purposes, one should administrate group-members through BAS group-admin for all NTNU-users (https://bas.ntnu.no/groupadmin/). This will then be synced into AURORA within half an hours time. Please also remember that only users that have logged into AURORA once, will be synced in place for their group memberships. This is because it is impossible for AURORA to sync and populate group memberships without having an actual account in AURORA to refer to. But, please add relevant users to the relevant fg-group in BAS and then tell the user to log into AUORRA using FEIDE.
Groups that are not NTNU-groups will have to be administrated through the AURORA web-client interface. This also goes for users that are added as members of non-NTNU-groups.
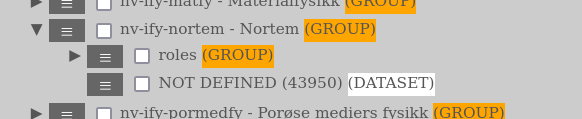
Now, it is important to remember that the research- and/or subject area groups (in AURORA just called research groups) are the ones that owns the datasets. This means that one has to manage how those datasets are being accessed and used by the users. This is done through groups that are set up as roles related groups (they are still just of the entity type GROUP). These can be accessed under root/NTNU/[FACULTY]/[DEPARTMENT]/Research Groups/[GROUPNAME]/roles, where “FACULTY” is the faculty acronym (eg. NV), “DEPARTMENT” is the department acronym (eg. IFY) and “GROUPNAME” is the name of the research group in question. So a full example would be:
/root/NTNU/NV/IFY/Research Groups/NTNU-NV-IFY Nortem/rolesWhen a user creates a dataset he has to choose where to save the dataset. This choice is a group which then will own the dataset. The user will by creating the dataset get all permissions on that specific dataset (except DATASET_MOVE, DATASET_DELETE and DATASET_EXTEND_UNLIMITED), but not necessarily to the other ones that resides with the group (he might not even see them).
The research group itself resides under the department or section in question under a sub-category called “Research Groups”. In AURORA the departments will be found under root/NTNU/FACULTY, where FACULTY is the acronym for the faculty, such as NV (Faculty of Natural Sciences). Under the specific research group in question the datasets will reside:
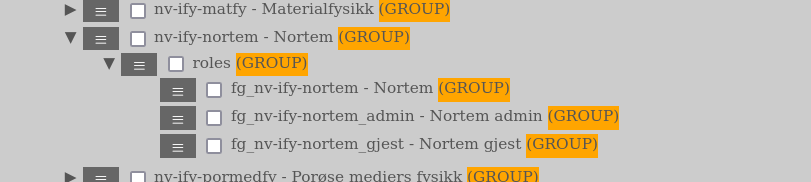
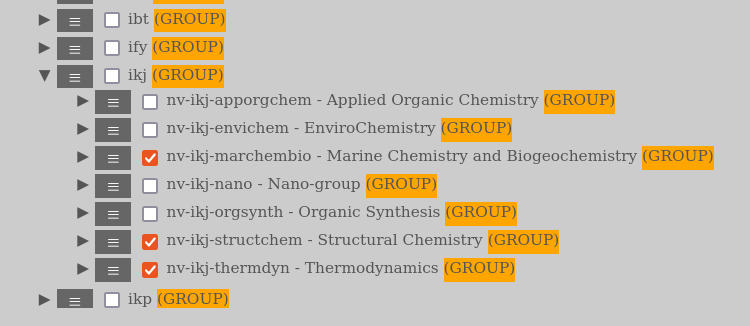
In AURORA we have divided all research groups into three roles (or role groups):
The _admin-group is for the administrators of the research group and have all the relevant permissions on the groups datasets (including updating, deleting etc.). The _gjest-group is for guests and only have the permission to create datasets on the group (cannot see the other ones, delete, read and so on - only his own datasets). The group that is just the group-name is for users that are members of that research group and they will have access to all the datasets created there, read them and their metadata, but will not have any change or deletion privileges except for those they have created themselves.
The role groups resides under the research group itself in a GROUP called “roles”.
When you find a role group which you have administrative permissions on (by residing in one of the _admin-role groups), you can add or remove members by left-clicking the symbol with the 3 horizontal lines and in the dropdown menu select “Members…”. The AURORA web-client will then open a separate tab or window with the “Member…”-window:
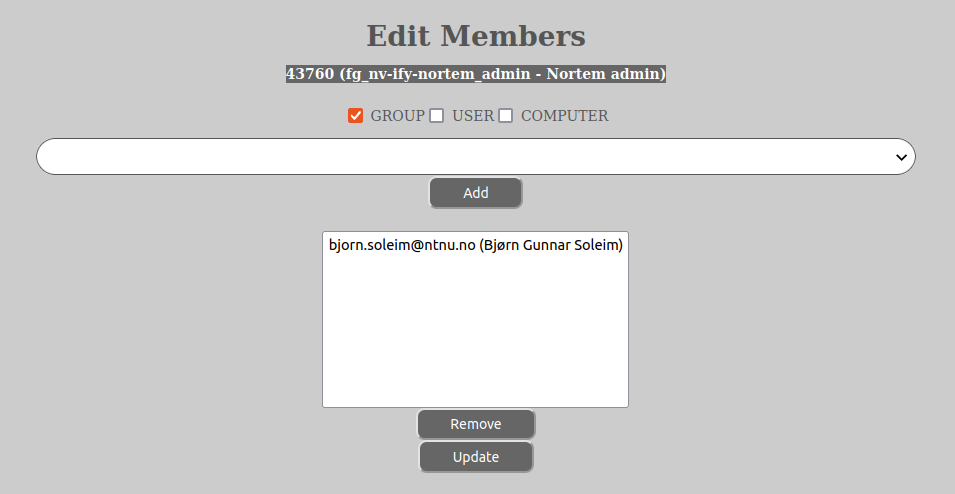
As the astute individual is able to find out upon seeing the “Members…”-window is that you can add both GROUP- and USER-entities. Please refrain from adding GROUP-entities if you do not know what you are doing. As best practice we recommend to only add USER-entities to the role groups.
The entities that are already members will be shown on top in the select-dialog in the “Members…” and separated from the tree by a long horizontal line. You can now add or remove members of the role group in question by selecting the user-entity in the select-dialog and then clicking on either the “Add” or “Remove”-button.
This option is available for: GROUP, COMPUTER, USER and TASK. It is also only available on an existing GROUP-entity wth the exception of TASK (which is also available on a USER-entity). The user must have the CREATE-permission (GROUP_CREATE, COMPUTER_CREATE etc.) on the parent-entity in question.
Please note that what metadata must be answered in order to create an entity depends on which templates are assigned to the entity tree and have effect on the parent-entity and the entity type that you are attempting to create.
When you select to create an entity from the drop-down menu on another entity, that entity will become the created entity’s parent.
This option is available for: GROUP, COMPUTER, USER, TEMPLATE and TASK. The user must have the _DELETE permission (GROUP_DELETE, COMPUTER_DELETE etc.) on the entity in question.
Please note that deleting a USER-entity is strictly not possible as it will only be anonymized (GDPR). Please see the AURORA web-client privacy statement for more information.
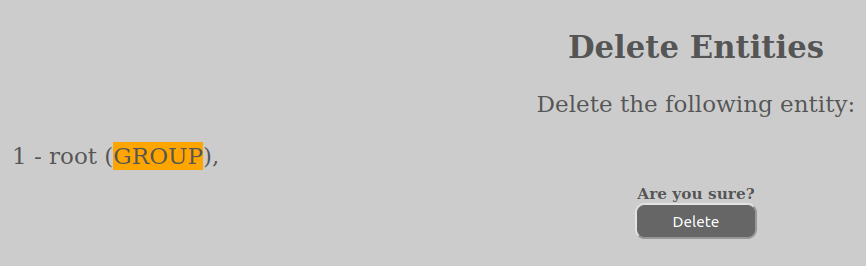
After you have confirmed the deletion, you should be presented with a success message.
Please note that you can also select several entities by ticking the checkboxes in front of entities in the tree. The delete functionality will then be able to delete your entire selection upon confirmation provided they do not have any children or other problems with doing it.
This option is available for: COMPUTER and DATASET.
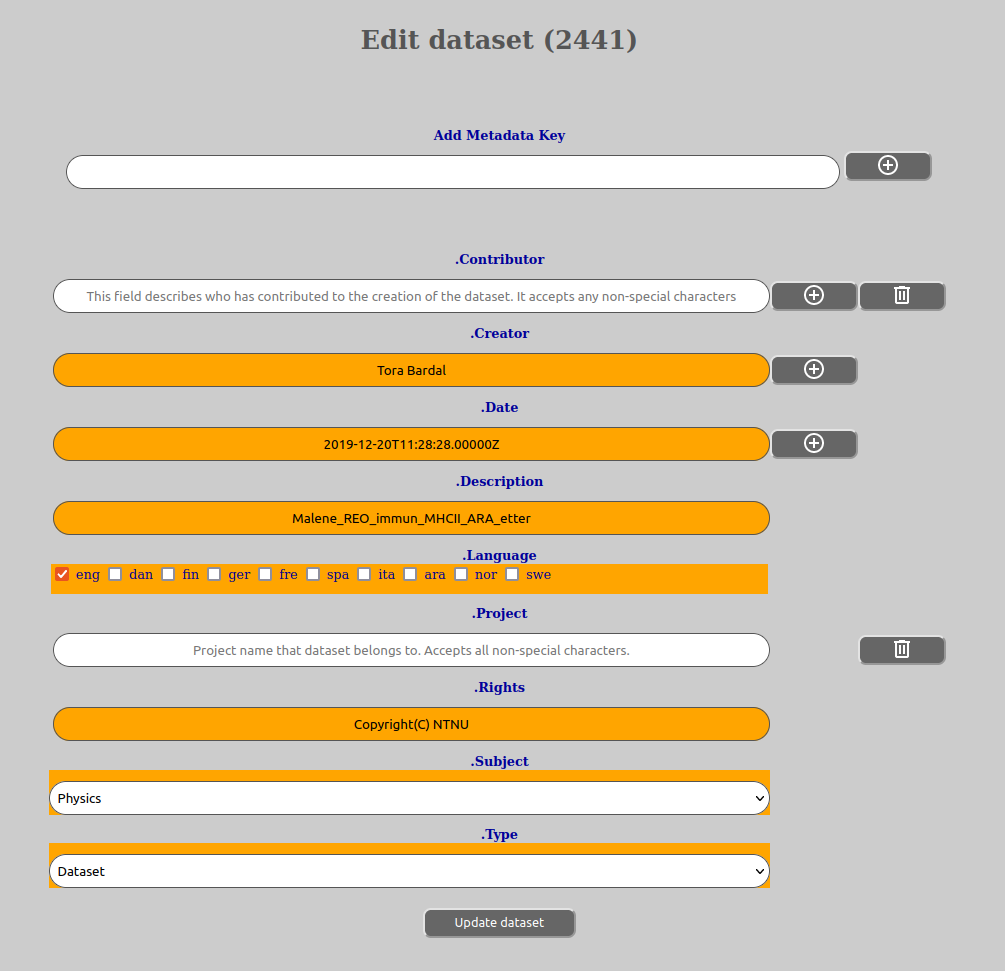
The possibility of editing metadata is available by selecting the “Metadata…”-option on the drop-down menu of the entity in question.
The web-client will then open a separate tab with the editing of the metadata. Which metadata appears in the window depends upon if any has been defined before and also any template(s) in effect will also influence the outcome.
When editing metadata for a dataset, you will see something like this (dependant upon templates in effect):
while editing computer metadata will be something like this:
An asterix on the right hand side of the metadata-key value input means that the given metadata-key is MANDATORY (see How to edit template). This means that you have to fulfill whatever requirement is on the key from any aggregated template(s). There is also a minus-button on the right hand side of the input-fields which makes it possible to remove that given metadata key or values on that key (a metadata key can have multiple values if so defined). Please note that even if you remove a field here that is defined as MANDATORY, it will fail upon checking and the metadata-script will come back and notify you if need be.
You can also add new keys to the metadata that are not defined by the template(s) in effect. You can do that by:

Allowable characters in a metadata key name is: a-z, A-Z, 0-9, “.” (period) and “-” (hyphen). Please be careful with adding metadata keys outside of template, as it is desirable that users add data on the same metadata keys to ensure sensible searchability. We suggest that if you have long-term needs for certain metadata you should notify your lab administrator about this so he can ask the system operator for this to added in template, ensuring correct metadata namespace allocation as well as use.
This said, you can customize your own metadata keys by doing this. Also remember that for normal metadata namespace, all keys have to start with “.”, so eg. “.ThisAndThat”, “.MyKey” and so on and so forth. The reason for this is that everything before “.” is system metadata and not accessible for users in a normal way and should usually not be addressed.
When you have made the necessary adjustments, hit the “Submit”-button and your changes will be submitted. You should receive a message saying the metadata has been successfully updated.
Please note that all metadata handling happens in a separate script called metadata.cgi and that therefore you will experience some redirects between the page you are in and that page. Therefore allow for time to reload/redirect.
As of this writing it is possible to edit permissions on GROUP, USER-, TEMPLATE-, TASK- and DATASET-entities. AURORA has a rich set of permissions that can be set or removed on any given entity. These permissions are also inherited down the entity tree, which makes it possible to set permissions higher up that have effect further down. The permission structure of AURORA is divided into 4 categories:
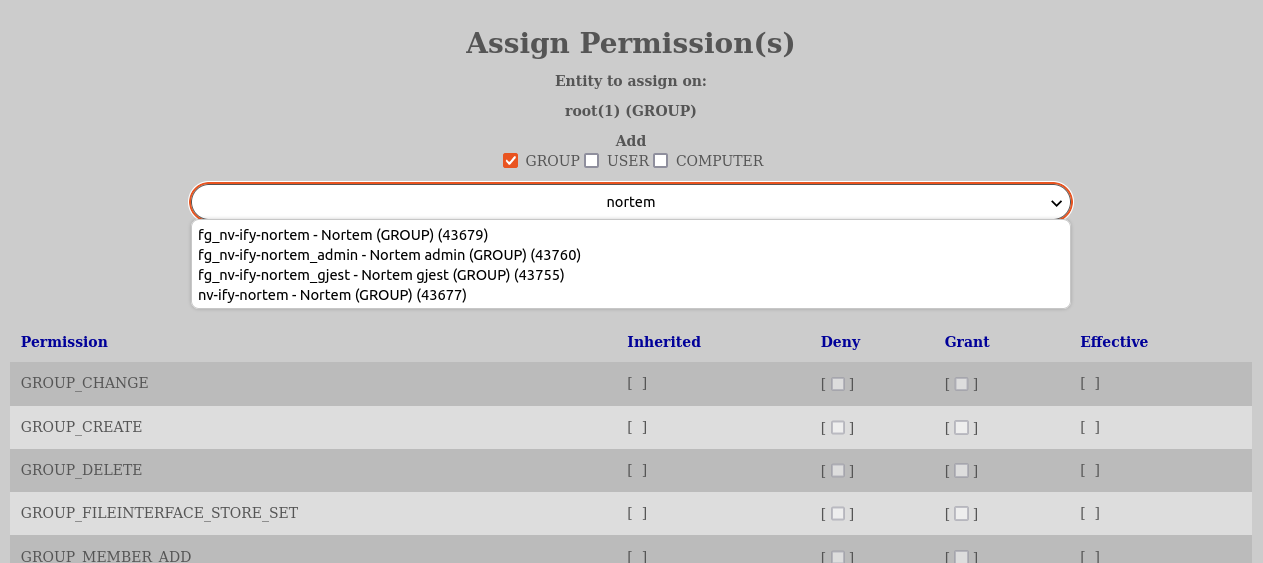
In order to edit permission on an entity you go to the “Manage Entity Tree” and then locate the entity you want to edit, click the icon with the 3 horizontal lines to the left of its name and select “Permissions…”. Then a separate window will open.
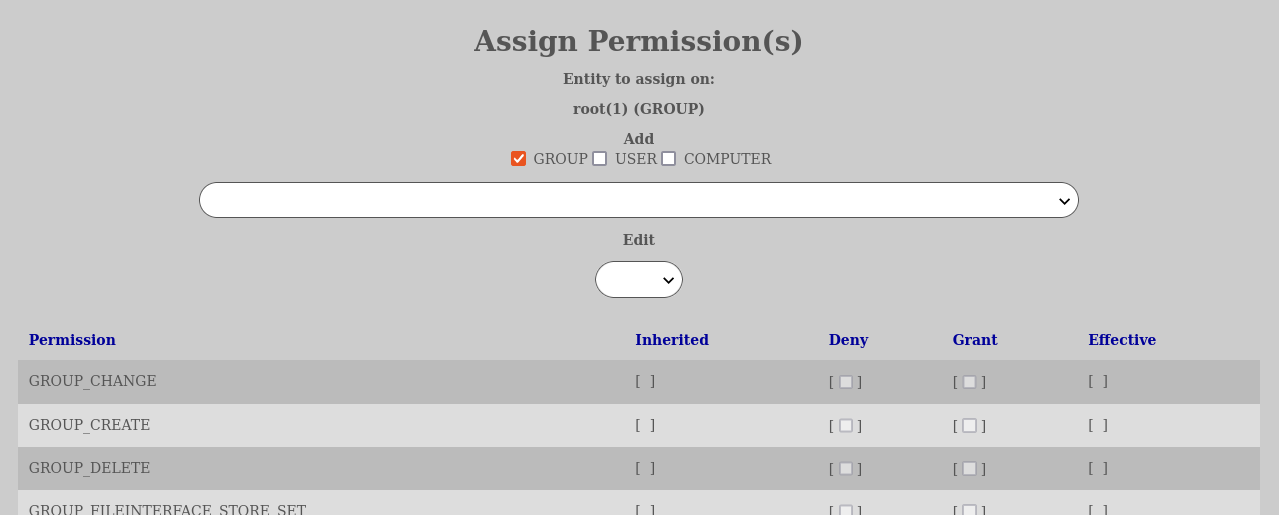
The permissions window will have two input fields, whereas the topmost is the selection of new entities to add permissions for on the chosen entity. This input field is searchable as most input fields of the same type in AURORA. It is also possible to narrow the search pool that one is using and by default only “GROUP”-entities are included. One can also tick off “USER” and “COMPUTER”-entities if those are to have permissions added.
The second input field is the edit field where one chooses the entity that already has permissions set on the entity in question. Here one can select to modify/change/review those permissions.

For practical reasons we can say that for most users, they should only edit permissions on datasets or the role groups of the research groups that owns the datasets (to make it effective for all datasets of that group). All other editing should be reserved for administrators.
As best practice we recommend to set the general permissions through the role groups (NAME, NAME_admin and NAME_gjest see the “How to add members on a group”-paragraph. If it is desired to have more granulated settings, we recommend that these are set on the datasets in question themselves (not on the research group or its role groups). This granulation can even be managed by the users that created the datasets themselves.
If there are any permissions for an entity, they will be displayed in the 4 aforementioned categories of “inherited”, “deny”, “grant” and “effective” (see above). One can then click the various permissions’ deny and grant checkboxes to change the permissions for that entity that you have selected and then click the button “Update” to make the changes active. When you press update, the web-client will try to update the new permissions and then show you the result after reload.
The inherited column will have a check mark in the middle of the []-clause if it has the permission in the respective row inherited from above in the tree. If nothing is inherited, there will be no checkmark there. If the entity that was chosen from the edit-field has either deny or grant-permissions set on the entity that one is viewing (in the example above the “ROOT”-GROUP or top of the tree), the checkmarks will be checked or not. In the effective-column a check mark will be shown if the permission on the respective row is in effect or not (either through inheritance or grant or both - yes you can actually set grant and then inherit at the same time).
This options is only available for GROUP-entities. The user must have the GROUP_CHANGE-permission on the group in question.
The subscriptions view sets two properties on a group:
An explanation of concepts is here required. All notifications sent by the Notification-service of AURORA must know which user(s) to send a notification to? All notifications are related to an entity in the entity-tree, typically to a dataset. What happens when the Notification-service attempts to sent a notification about eg. a dataset, is that it starts on the level of the dataset in the entity tree and then notifies the dataset creator of any events.
However, certain notifications in AURORA requires a voting process to commence, to decide if the given action is to be executed or not? Typically examples of such notifications are when a dataset has expired or if it has been asked to be removed. These types will start a voting process on whether to eg. remove the dataset or not? If the user notified on the dataset-level in the entity tree does not vote or are not able to cast enough votes him-/herself, the notification will be escalated to the next level in the entity tree (the parent group of the dataset at first). The Notification-service then tries to determine if any user(s) have voting rights on that level and which users using what Notice-delivery. It then sends to these users. If these users does not answer or do something sufficient to stop the process, it will be escalated to the next level in the entity tree.
The subscription view allows the user to edit the settings of which users subscribe to which Notice-deliveries and furthermore what number of votes they have, if any on that given group-level.
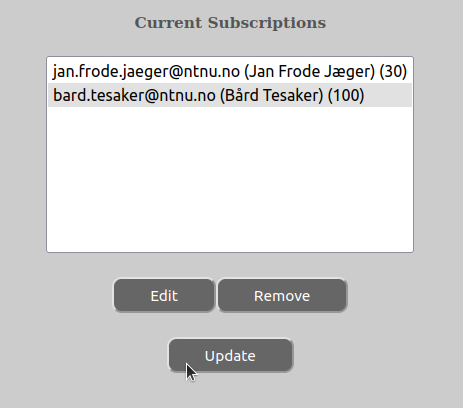
In order to add, remove or change subscription settings, do the following:
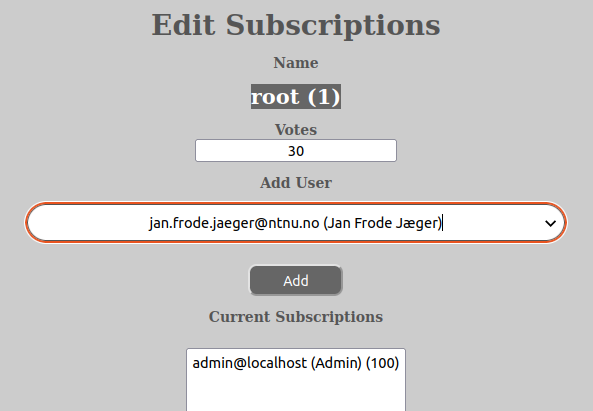
Remember that all changes needs to be committed by pressing the “Update”-button.

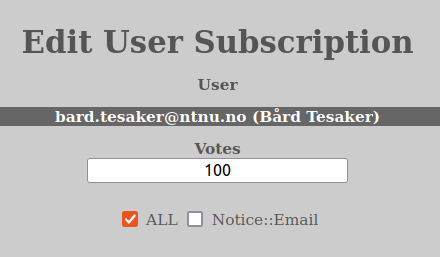
One can change the number of votes of the user here by updating the number in the “Votes”-input or change what Notice-types the user is subscribing to by selecting or un-selecting choices in the checkboxes that are visible.
You can close the edit user subscription window by clicking the “x” in the top-right corner.
Remember that all changes needs to be committed by pressing the “Update”-button.
Remember that all changes needs to be committed by pressing the update-button afterwards.
In order for the changes you have made to the subscription on the given GROUP-entity in question take effect, you have to press the “Update”-button in the main part of the edit subscription windows:
This option is only available on a TEMPLATE. Its purpose is to edit the templates that either are or will be part of entity tree through template assignments (see the paragraph (How to assign templates)[#how-to-assign-templates)). AURORA have the ability to define any number of templates consisting of any number of key-definitions.
Templates and their settings are inheritied down the entity tree, so that a template assigned on top of the tree will have effect down to the bottom of it, if no other templates override its settings on the way down. The overrides do not happen per template, but per metadata key in the template, so that the aggregated result of templates are the aggregated collection of template’s definition for any given metadata key.
Lets take as an example the metadata key for an entity’s creator:
.CreatorAs you can see the metadata key start with a dot (“.”). All open metadata must reside under “.” and then something. Metadata above “.” is considered system metadata and cannot be changed through normal REST-server metadata methods. Nor can this data be accessed through the REST-serves normal methods. It is therefore a rule in AURORA that all metadata defined by the user is to reside in “.” namespace which is considered “open”. Templates can define metadata anywhere in the namespace, but be careful with the differentiation between open and not open metadata if you want the user to be able to read and or change the metadata.
Furthermore, templates in and of themselves do not have any types (DATASET, GROUP, COMPUTER etc.). Templates gains validity for an entity type once it is assigned to that type (see the “How to assign templates”-paragraph).
Now, once you edit a template there are the following fields to contend with for each metadata key that is defined:
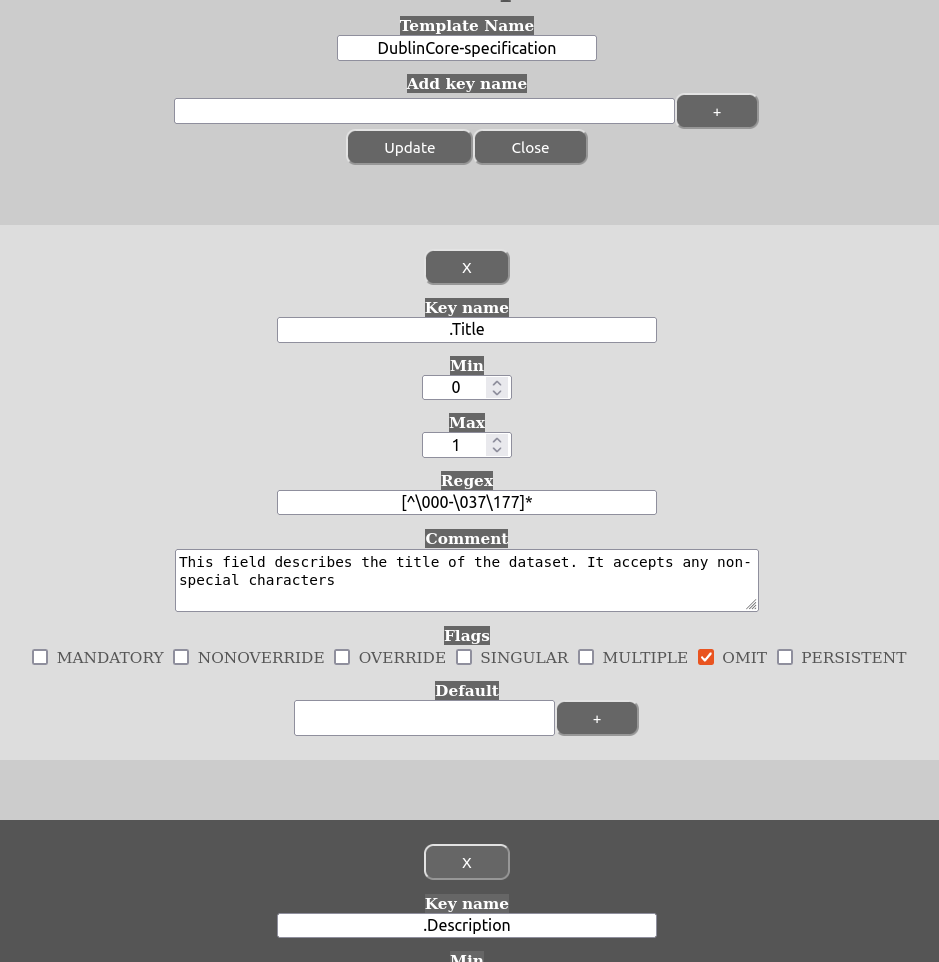
The meaning of the various flags are as follows:
Please note that if a value is required (through MANDATORY) and none is defined, it will select the first element from default (if available).
As already mentioned, the PERSISTENT-flag should be used with caution. Once a value is set it is impossible to change it and the only way to circumvent the issue is to change the template that defined it PERSISTENT, update the value and then set the template back to PERSISTENT.
As can be seen, the use of multiple defaults can be used to define drop-downs and checkboxes by using the SINGULAR and MULTIPLE-flag accordingly. Please note that SINGULAR and MULTIPLE-flag at the same time is not allowed and SINGULAR will be preferred.
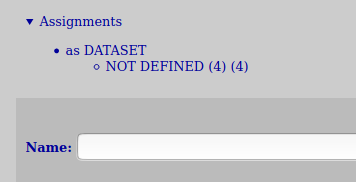
On top of the template-view one can see a heading called “Assignments”. This expandable header will you an overview of where the template being edited has been assigned and as what type it has been assigned as (if any at all). This can be practical when planning what changes to do on a template and better understand their potential implications.
In general, be careful with giving too many people the permissions to edit or create templates. Defining them is a careful prosess and assigning them even more so. In addition it might lead to quite undesired results.
Some general steps:
Please not that in the case of a metadata key that is both MANDATORY and SINGULAR, AURORA will select the first default value in the default-values defined if none is specified by user when entering metadata. This is how it satifies these requirements. Be therefore careful to add your desired default value first in the case of such scenarios.
When you are finished making changes, press the “Change”-button and the changes will be written to the database.
This option is available for: DATASET, GROUP, COMPUTER, USER, NOTICE, INTERFACE, STORE, TEMPLATE and TASK. The user must have the _MOVE permission (GROUP_MOVE, COMPUTER_MOVE etc.) on the entity being moved and the _CREATE permission (GROUP_CREATE, COMPUTER_CREATE etc.) on the new parent entity.
Please also remember that not all entities can be moved to any entity type that you would like.
Here is a list of constraints:
As you can see the restraint is centered around GROUP being the parent. These constraints reflect the restraint that you also have creating these entities.
You can select to move one entity or multiple entites at once. The procedure to do one or the other is the same:
A new window will come up with information about the entity(-ies) that you have selected to move. Click the “Move”-button to proceed with the move.
Please note that not all moving of entities might be allowed based upon everything from missing permissions to unallowed locations or combinations. Therefore consider carefully what you do before attempting to move the entity(-ies).
This option is available for: GROUP, COMPUTER, DATASET, TASK and TEMPLATE. The user must have the _CHANGE permission (GROUP_CHANGE, COMPUTER_CHANGE etc.) on the entity being renamed.
Please note that some entities might enforce rules as to what you can rename the entity to. An example of this is TEMPLATE-entities’s name that has to be unique and even the name might be restricted by TEMPLATE-definitions (the constraints of the template definitions are not decided by templates, but the name of a template is located in its metadata and might have templates in effect for it).
In order to rename an entity do the following:
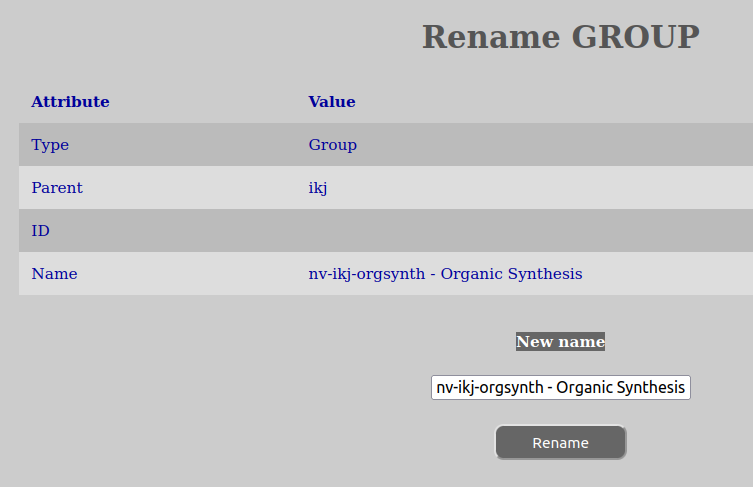
A new window should appear giving you a success message or it will inform of any issues with renaming you entity, such as missing permissions or invalid name. Please take steps to correct any issues and try again.
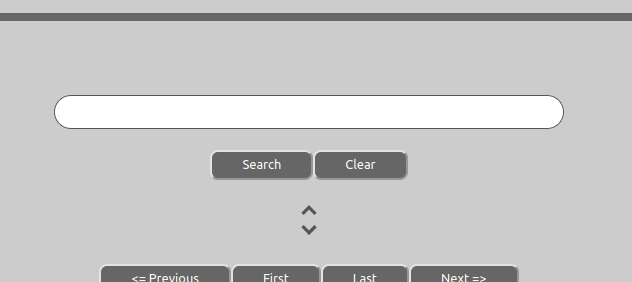
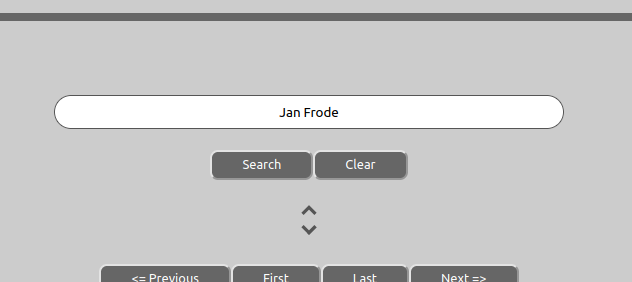
Sometimes it might be difficult to know where in the entity tree an entity resides and therefore the web-client supports searching for entities by expanding the tree in relevant places. Please note that the searching mechanism is very rudimentary and is only meant to assist in finding what one is looking for in the tree.
You can search for an entity in two ways:
To search one enters the relevant information in the “Search for entity”-input box on the top of the “Manage Entity”-page and click “Search”.
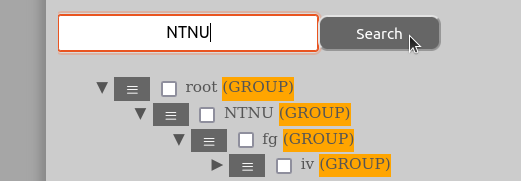
If one instead wants to search for an entity by its name, one enters the name of the entity in the “Search for entity”-input box. If one is uncertain about the whole name of the entity one is searching for part-names are also accepted.
Hits from searches will be shown in bold and the parts of the tree not already expanded will become expanded in the process.
If one has problems locating the hits on the page, please use the search-option in the browser itself to find it on the page.
AURORA has the ability to perform tasks by running scripts written in the Lua language (see here for documentation of lua). Lua has been completely embedded within the AURORA web-client and can be used to write scripts that perform any task with complete interface to the AURORA-server REST-API (see here for a documentation of all this).
In addition to the lua functions and language, some extra library functions have been defined as follows:
All these functions above can be used in your own Lua language scripts. Because some of the code of these functions are included inside the Lua script that you are running, the start line of the code will never be line 1. The only code showing in the window that is being edited is the code for the script being created. The rest has been hidden away as system code.
Example of lua code that calls the AURORA API:
-- Create the table/hash that contains what we are asking for
params={};
params.id=1;
-- call aurora's getName API method and include the parameters table
mydata = aurora("getName",params);
-- print the complete contents of the return data in mydata
print (dumper(mydata));
-- address and print just one value from the return data
print ("Name: " .. mydata.name .. "\n");
Example of lua code that asks for input to the script:
-- ask for input and return what you get. Set the message to be displayed
-- as well as the default value for the return
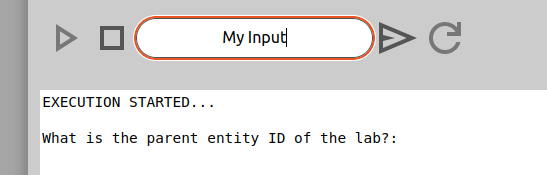
value=readstr("What is your name? \n","John Doe");
print ("Hello " .. value .. "\n");Observe that the message to be displayed when getting input contains a new line character. This is because the question will be shown in the script execution window of the AURORA web-client and it needs a new line here in order to avoid line output ending up on the same line. It has no consequence for the input itself in the web-client. That input is handled by a text input dialog of the GUI.
In order to be able to create a script, you have to have the SCRIPT_CREATE permission the group entity that is to be the parent of the new script.
To do this, go to a group in the entity tree where you want to create the script:
If you have the correct permission, a new script will be created.
In order to be able to edit a script, you have to have the SCRIPT_CHANGE permission on the script in question.
In order to edit a script do the following:
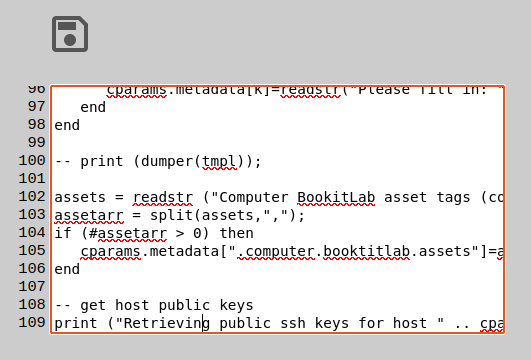
Inside the script dashboard, you will have the edit window on the right, with a column of numbering on its left side that helps to show where you are in the code. Please again be aware that the numbering do not start on line 1 and this is due to auto-included functions (see above).
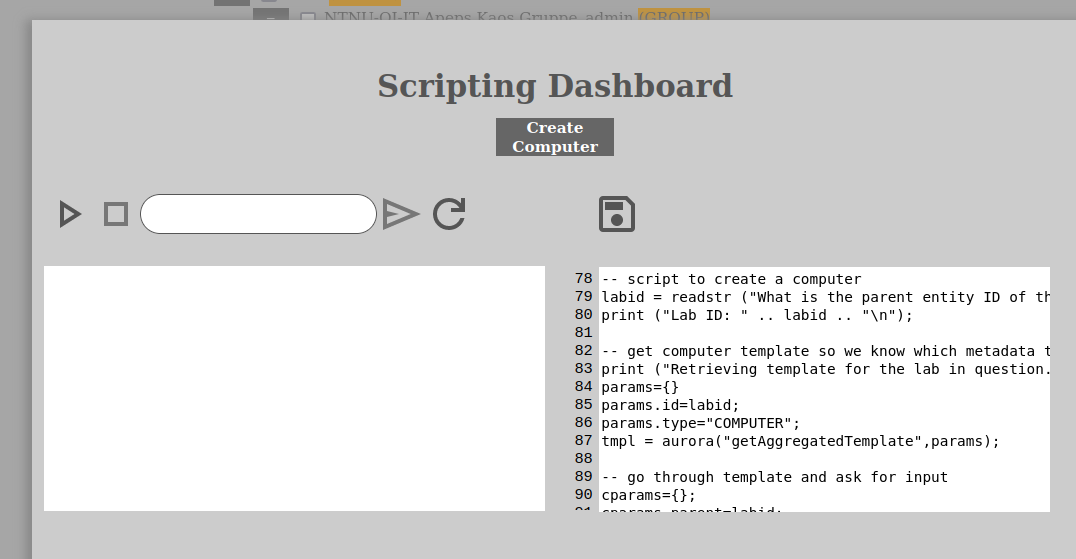
You can now edit the script as you want to in the window to the right.
Everyone can in theory run a script, but before you run it, you have to be able to read it/get it. So running scripts therefore requires that one has either the SCRIPT_READ or SCRIPT_CHANGE permissions on the script in question.
To run a script, do the following:
Inside the scripting dashboard you will have the run window on the left with some buttons placed above it. These buttons are for running. stopping, the input text box, sending input and reloading the script.

The button to the uttermost left is the play-button. The next button to the right of it is the stop-button. Then comes the input dialog followed by its send-button to send the answer into the lua code being run. At the end is the reload-button which will reload the code being run.
The execution can be permanently stopped at any point while being run, even if the lua engine is asking for input and waiting. The reason for the reload-button is that the edit-window (to its right) and the run-window are two separate windows and one can choose to edit the code without it being updated for whats being run. So whatever has been edited, must be saved before it is then reloaded in the run-window and then run.
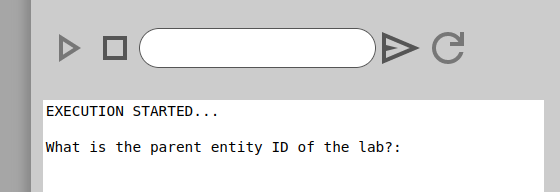
When the script is running you can follow what is happening in the window below the toolbar.
When a lua script is running in the scripting dashboard it will sometimes ask for input that are relevant to the script. When this happens the execution of the script halts and one is expected to answer in the text box that are together with the play-, stop-, send- and reload-buttons on the toolbar.
When input is being written, one just clicks on the input box and then writes whatever one wants to and then hits enter or clicks the send-button on the right side of the input box. This will inject the text from the input box into the lua engine.
Sometimes the input box will also contain a default value when the lua engine stops and waits for input. This will then be default value supplied by the readstr-function of the lua-code.
In order for the the AURORA-system to know when a dataset is supposed to expire, it needs to have this information when creating datasets. For this to happen it needs to be defined socalled “lifespan”-policy(-ies) in the entity tree. These policies are templates with settings in the namespace for the lifespan- and expire settings. In order to adjust the expire time of a dataset, the user needs to have the DATASET_DELETE-permission.
These settings are located in the keys called:
system.dataset.open.lifespan
system.dataset.open.extendmax
system.dataset.open.extendlimit
system.dataset.close.lifespan
system.dataset.close.extendmax
system.dataset.close.extendlimit
so in order to define this policies, one has to create templates that sets a default value for these keys. The same settings exists for both “open” and “close” status of the dataset. The reason for this is that one can have the dataset exist for a certain amount of time in an open status before the AURORA-system triggers a close-dataset notification that the user(s) have to take into account. The reason for this mechanism is that all datasets should at some point be closed.
The “system.dataset.open.lifespan” sets the number of seconds that a dataset is to exist after it has been opened and before it is closed. The “system.dataset.open.extendmax” sets the number of seconds that the user(s) are allowed to extend the open dataset when asking for an extension upon eg. the dataset being asked to close. The “system.dataset.open.extendlimit” is the maximum number of seconds the dataset can exist after which the dataset cannot be extended anymore by the user(s). After the maximum extension limit has been met, the only way to prevent an open dataset from eventually being closed is either to discard it or have a user with the DATASET_EXTEND_UNLIMITED-permission on the dataset in question.
The “system.dataset.close.lifespan” sets the number of seconds that the dataset is to exist after it has been closed. The “system.dataset.close.extendmax” sets the number of seconds that the user(s) are allowed to extend the closed dataset when asking for an extension upon eg. the dataset being ready for expiration/removal. The “system.dataset.close.extendlimit” is the maximum number of seconds the dataset can exist after which the user cannot extend it anymore. After the maximum extension limit has been met, the only way to prevent a closed dataset from eventually being removed is to have a user with the DATASET_EXTEND_UNLIMITED- permission on the dataset in question.
It is natural that the limit-setting for an open dataset is much lower than for a closed one (although it is completely flexible). Here are some example settings:
system.dataset.open.lifespan       = 259200 # three days
system.dataset.open.extendmax      = 86400 # one day at a time
system.dataset.open.extendlimit    = 604800 # maximum extension time is a week after open
system.dataset.close.lifespan      = 2592000 # a month after closing the dataset
system.dataset.close.extendmax     = 1209600 # you can extend for up to 2 weeks at a time
system.dataset.close.extendlimit   = 15552000 # you cannot extend for more than 6 months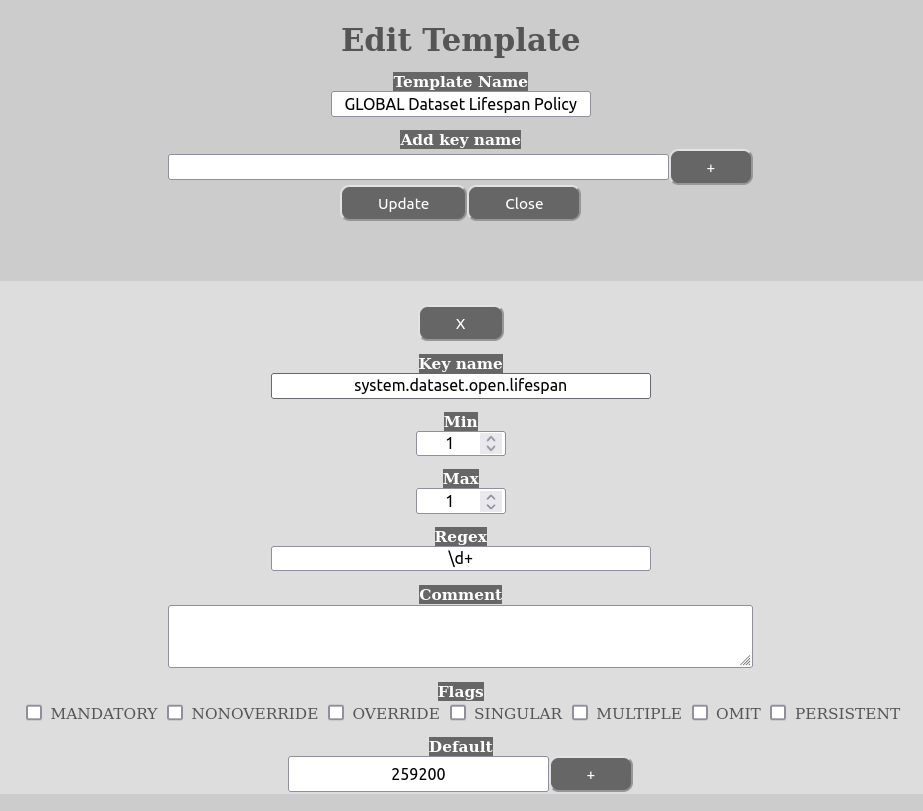
When the template has been created and defined, one has to assign the template where one wants it to have effect in the entity tree. It is also possible to set these settings in different templates if so wished for. The settings will then be inherited down the tree from where they were assigned, except if another template or templates happen to override it.
Please note that even though the settings will be written to the metadata of datasets, when it is being used it will only be read from the templates and not the metadata. Also take care that when assigning such templates that they are assigned as being valid for the entitytype “DATASET”. Also take care not to enable any of the template-flags, except “NONOVERRIDE” if that is desirable in any situation. The reason for not choosing any of the others is because this settings is not supposed to be editable metadata, but taken directly from the templates, so to avoid any issues it is best to not tick any of these flags.
For guides on how to create and edit templates, see the How to create an entity and How to edit template-paragraph. For assigning templates, please see How to assign Templates.
By defining and assigning such templates one can control the lifespan policy down to the individual owner groups of datasets if one chooses to.
In order for the AURORA-system to know when to notify the users about datasets that are about to expire, one needs to set interval policies. These are defined in the form of templates assigned to the entitytype “DATASET”.
The namespace for the setting is in the key:
system.dataset.notification.intervalsso in order to define these intervals one has to create template(s) that set default values for these intervals. This is done by assigning multiple values on the default-setting of the template.
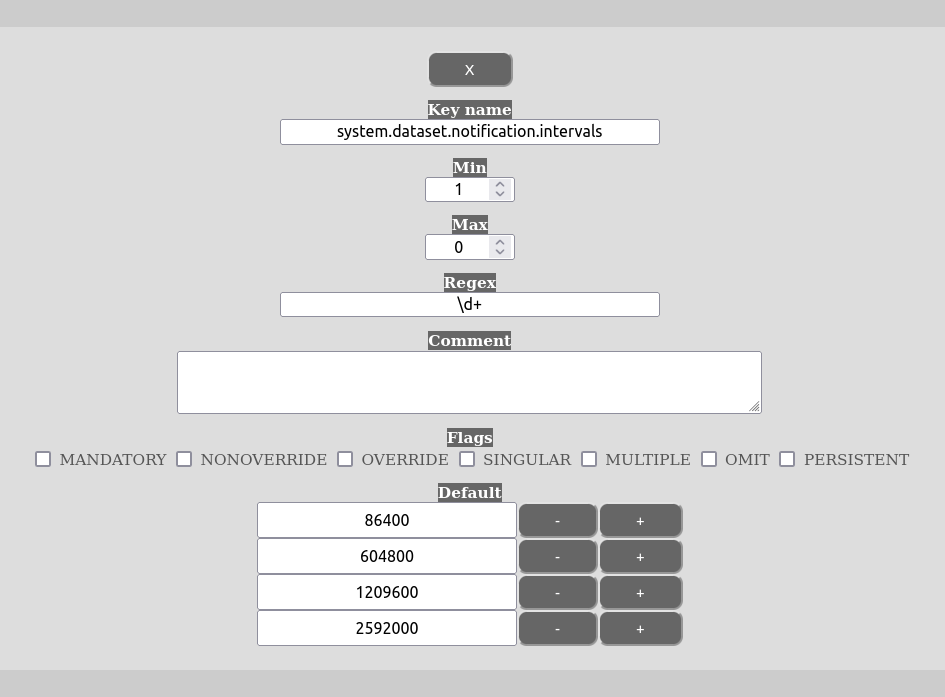
Please note that one does not need to have the default values in ascending order. The order of the notification intervals are not important. Please also avoid setting any of the template flags, except NONOVERRIDE if that is needed in any situation. The reason for this is that the settings in this template are used as a template and not as metadata.
For guides on how to create and edit templates, see the How to create an entity and How to edit template. For assigning templates, please see How to assign templates.
By defining and assigning such templates one can control the notification interval policies down to the individual owner groups of datasets if one chooses to.
In order for the AURORA-system to allow for remote controlling its computers, one needs to set one or more remote control policies. These are defined in the form of templates assigned to the entitytype “COMPUTER”.
The namespace for the setting is in the keys:
system.gatekeeper.host
system.gatekeeper.keyfile
system.gatekeeper.knownhosts
system.gatekeeper.protocols.RDP
system.gatekeeper.protocols.VNC
system.gatekeeper.script
system.gatekeeper.username
The host-setting is the host-name of the gatekeeper-server that is running the gatekeeper-service. The keyfile-setting is the name of the private keyfile to use when connecting to the gatekeeper-server. The public part of that key needs to be registered with the gatekeeper-server in the user of choice’s authorized-keys-file. The knownhosts-setting is the public key of the gatekeeper-server (it should be in the format of: host-name knownhosts-value). The host-name in knownhosts must match the host-name in the host-name parameter. The script-setting is the script to run on the gatekeeper-service to create/open the tunnel. The “username”-parameter is the username to use when logging into the gatekeeper-service with SSH and running the gatekeeper-script.
Lastly, the system.gatekeeper.protocols.-settings are the valid connection protocols for the template. It can be any name that one wants after protocols., but they need to be uppercase. The value part of each key in protocols. is the port number of the protocol in question, so that eg. the VNC-protocol would be:
system.gatekeeper.protocols.VNC = 5900Please note that not any of the template-settings for remote control should use any of the template flags. Do this and you might have unintended side-effects and problems.
This option is only available for GROUP-entities. In order to assign template you need to have the permission GROUP_TEMPLATE_ASSIGN on the GROUP-entity in question.
One can assign any number of templates that one wishes on a GROUP-entity. The templates will take effect in the order that they are assigned and the last TEMPLATE-entity in the list will take precedence for any given metadata key that are defined several places in that list. The order of the list can easily be changed in the assign template view.
Please also be aware that templates in and of themselves are neutral and it is only when you assign them that they must be assigned as having effect for an entity type. A template can be assigned on any GROUP entity that one wish to and for differing entity types at the same time (but ensure that you do not create too much chaos in your entity tree and that it comes back with a vengeful karma).
In order to assign templates do the following:
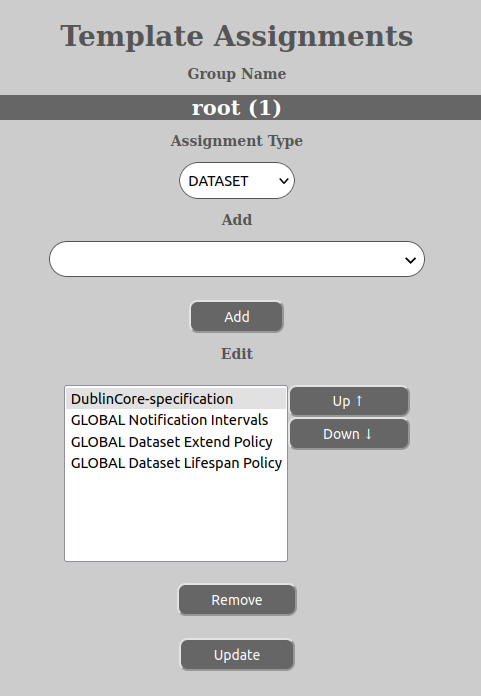
At this point it might be that you wish to rearrange the order of the template assignments (see above). It might also be that you do not wish to assign any new template, but that you only wish to change the assignment order.
In order to change the template assignment order do the following:
When you are satisfied with the changes you have made, press the “Update”-button to save the changes and make them active.
This option is available for: USER, GROUP and COMPUTER. The user must have the TASK_CREATE permission on the entity in question (USER, GROUP or COMPUTER).
Tasks are a way of defining distribution policies in AURORA. They tell the system where to fetch the data for the dataset (in case of automated acquire datasets) and where to put them (in the case of both automated acquire- and manual acquire datasets). It can even define deletion-processes.
The tree sub categories and order of execution of a task is:
When a automated acquire dataset is being created, the AURORA system probes the path from (and including) the COMPUTER being the source of the dataset and up the entity tree to find the first available task. If it on any of the entities find one or more tasks, it will select the first task with which alphabetically comes first and use that as the main task for the get-, put- and delete-operations of the dataset. Furthermore, it will combine the data in the task with metadata from the COMPUTER, such as host-name and other parameters to form a complete set of parameters to perform whatever operations has been defined by the task.
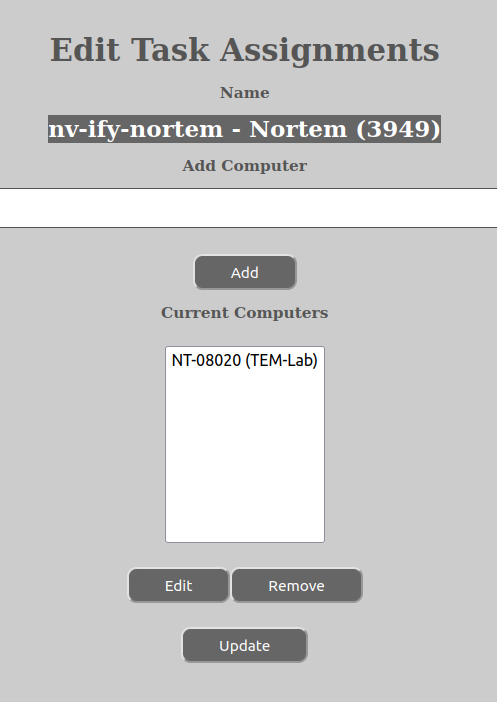
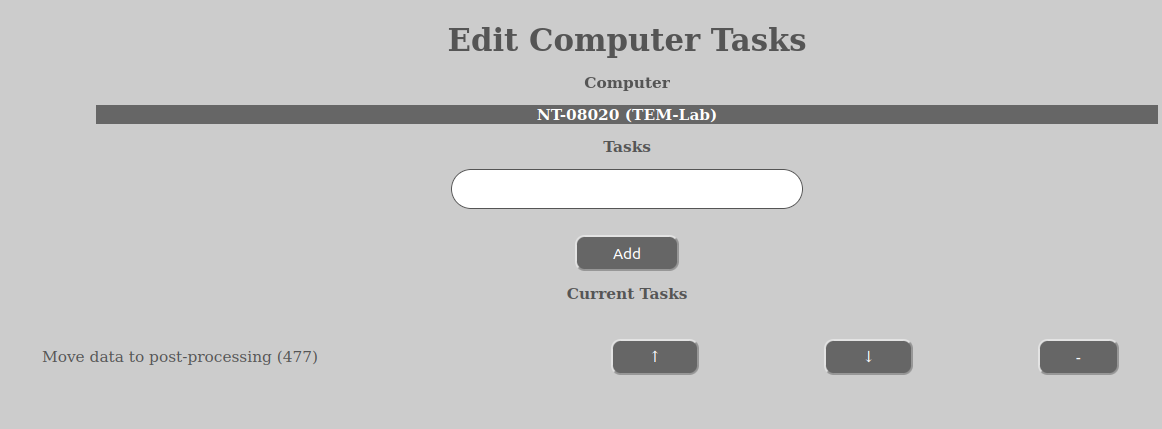
In addition to this, it will also search the owner group of the dataset and the user being the creator of it, for any task assignments on the COMPUTER in question (see “How to edit task assignments). If it finds any assignment(s) here it will take those tasks’ put- and del-definitions (not get) and add to the put- and del-definitions from the task first selected as the main task. So, in other words, this mechanism enables the owner group and the user creating a dataset to have their own policies on where the dataset is to be copied after it has been closed. The put- and del-operations will only be run once the dataset has closed. Therefore they will also be executed for manual acquire datasets.
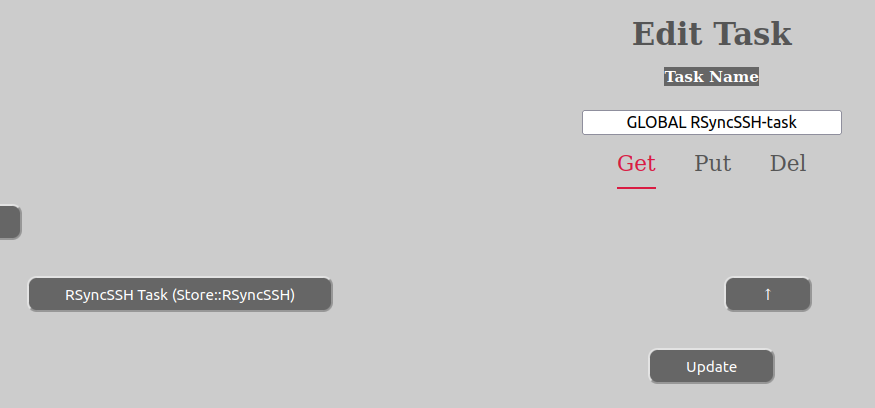
If you only want to do certain operations of a task’s sub-categories, only define data for that category and no one besides this. In the example above, only one “get”-operation has been defined (“RSyncSSH Task”) and it is general, since it does not define the host-name or any host-parameters (which are taken from the COMPUTER metadata using this task).
For a user it makes sense, to only define put-operations. There is no way right now for the user or dataset owner group to define any get-operations, since the get-part is defined globally at the top of the entity tree. We aim in the future to provide the possibility of executing tasks manually outside the create dataset workflow. Right now this is not possible.
You can define as many get-, put- or del-operations that you want in one, single task. Also note that within the sub-category (get-, put- or del) the order of the operations matter, since the topmost one will be executed first.
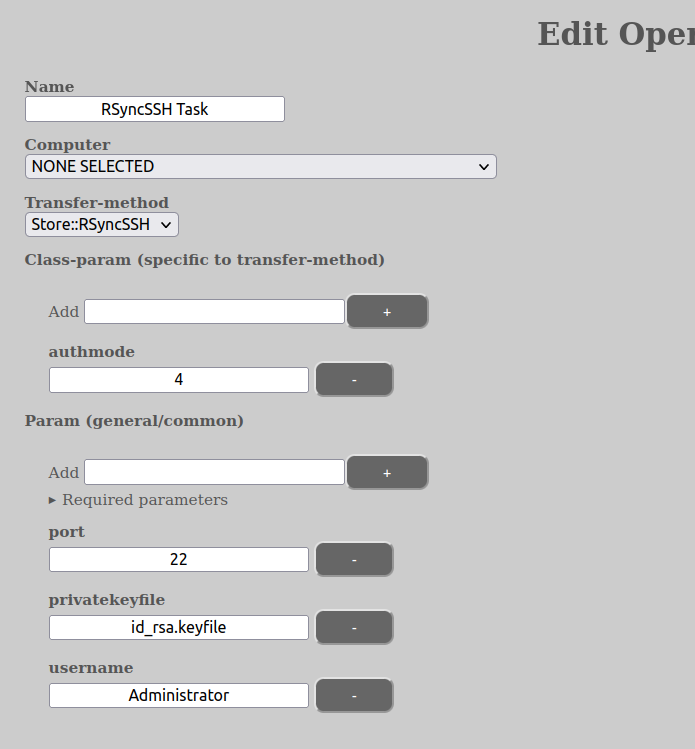
The name-parameter of an operation (not the name of the task itself) is just a label for the user and has no value to system itself. The Transfer-method parameter says which transfer protocol is to be used. The most common one is the Store::RSyncSSH, which is the safest and preferred method. We aim to also provide access to cloud protocols in the future, such as OneDrive, GDrive etc.
Another important parameter is computer, which potentially defines which computer the operation is to be performed on. This parameter can be “NONE SELECTED”, which means that none has been set. In the case of running a task as part of a “create dataset” event, the computer will be filled in by the REST-server no matter what the task may say in the first get-operation. For other operations, it needs to be filled in and the computer to be registered in AURORA.
In addition to these, you have two parameters with sub-parameters called “class-param” and “param”. “class-param” are parameters to the Store-class itself (ie the transfer-method class). Usually it is enough with the “authmode” parameter here (see below for an explanation). The “param” parameters are parameters to the Store-class when connecting to the COMPUTER in question. This can be anything, but the most common, as the image above shows, is port, authentication information (in this case the private ssh key used) and lastly the username being used to connect with. All of these parameters, including the ones in class-param, can be overridden by the metadata of the COMPUTER in question.
You can also get the edit task view to show you which “param” are necessary given any set “class-param” of the chosen Store-class (transfer-method). This is achieved by setting the class-param that you want to have, then let the view update itself and then expand the caret called “Required parameters”. It will show you which key(s) are required and what are the defaults if not specified. It will also show you the regex-requirements for the param key (for those of you who happen to be lucky enough to have achieved fluency).
In the example above, the rest of the information in “param” is provided by the COMPUTER-metadata, such as the host and the public key certificate.
As goes the mentioned “class-param” called “authmode”. It is valid across all the Store-classes and defines how the authentication with the host is performed. Valid modes are digits 1-4 (although not all might have meaning to all Store-classes):
It is advised that the expected parameters of these 4 modes are provided in the COMPUTER metadata if tied to a COMPUTER in the entity tree. So, in other words, set the authmode in the task, but let all required parameters of authmode be set in the metadata of the COMPUTER-entity.
Please also note that if you use password-files they have to have names that end in “.pwfile”. For certificate-files the private-key needs to end in “.keyfile”. Furthermore, all of these types of parameters are sandboxed and can only fetch files from within the location specified in the sandbox-parameter of the AURORA-system. This means that these parameters are only for administrators and we advise users to not use password- and/or certificate-files in their tasks. We also urge administrators with being careful about using password-files, since all users can create tasks and in that way access all your password-files in the sandboxed area and potentially deliver that password as a password to a server they control and in this way be able to access your password and thus potentially compromising your servers.
But their ability to access computers with your certificate-files are limited, since it requires them to also have the COMPUTER_READ-permission on the computer they are attempting to access.
Please note that tasks have permissions on them and are not readable without the correct permissions by any user. However, we still strongly advise caution with saving passwords and authentication details in the task. We advice against using AURORA as a authentication repository since the side-effects in the event of a security breach can be huge.
In the case of connecting to services that allow tokens or access keys to be generated (such as cloud-services like DropBox, OneDrive and so on and so forth), we advise that you instead create such token(s) for a part of the service and store that in the task, so that even if the task-data is compromised you do not compromise your whole cloud acccount.
Common params to know about with Store-types (all are lower case):
Not all of these are necessarily used by the Store-type in question, but they are recurring in several. The parameter “remote” is always there, but it is being auto-filled when running get-operations as part of creating a dataset. “remote” always signifies the remote computer, independent upon if the operation is get, put or del.
These permissions are needed on the computer in question to run the various operations:
This option is only available for USER- and GROUP-entities. Its purpose is to assign existing task(s) to computer(s).
In order for the research group (or any group, except roles) or user to define what is to happen to the dataset after it has been closed, it is possible to assign task(s) to the computer that is the target of the dataset (both manual acquire and automated acquire ones). The tasks assigned in this way will have their “put” and “del” parts added to the distribution task of the dataset, so that they can in this way constitute a distribution policy for the user or the group in question. Multiple tasks can be assigned at the same time.
The user task(s) are only added from the user that creates the dataset. The assigned tasks from a group is only added if the owner group is the same as the assigned group. In all other cases they are not used.
This means that if you create a dataset yourself and you specify that the dataset belongs to “My Group” and that you are creating the dataset from “Computer A”, only tasks that have been assigned for your user to “Computer A” and tasks assigned for “My Group” to “Computer A” will be used for the “put”- and “del”-definitions for that dataset (check the documentation on “How to edit tasks” for more information). These parts of the task will be run as soon as the dataset has closed.
In order to assign such tasks do the following: